Yesterday, we submitted our OpenClaw + Gmail customer service Skill to ClawHub.ai. We expected people to try it. We didn't expect the setup questions to arrive so quickly. Most of the people who wrote to us already use OpenClaw; they were getting stuck after installation, usually at the point where Google asks for an OAuth JSON file.
I went through the setup again and wrote down what happens in the order an ecommerce operator will see it. If you want to check the features and permissions first, open the Skill detail page on EcomAgentTools. Otherwise, start at step 2. After installation, the checks, configuration, and tests all happen through an OpenClaw conversation. OpenClaw runs the commands. You confirm the store and mailbox details, then complete a few authorization screens in Google Cloud.
1. Haven't installed OpenClaw yet? Start here
If you came from ClawHub, OpenClaw is probably already installed. Skip to step 2. This section is for readers who found the guide elsewhere and haven't installed it yet.
Open your terminal and paste in the installation command from the OpenClaw website:
curl -fsSL https://openclaw.ai/install.sh | bash
The installer checks the local environment and starts onboarding. Prompts vary slightly by operating system, so follow the official OpenClaw installation guide if your screen looks different. If OpenClaw already works on your machine, don't reinstall it.
2. Install the customer service Skill in OpenClaw
Start a new OpenClaw conversation and send it this prompt:
Install version 1.2.8 of the
ecommerce-gmail-customer-serviceSkill published by EcomAgentTools on ClawHub. The installation command isopenclaw skills install @ecom-agent-tools/ecommerce-gmail-customer-service --version 1.2.8. After installation, run initialization and a status check, then follow the Skill's onboarding one phase at a time and ask me only one question at each step. Run any commands yourself; don't send me back to the terminal.
Use the full publisher name, @ecom-agent-tools. ClawHub has other Skills with the same name, so a slug alone leaves OpenClaw guessing. If you have an older version, ask OpenClaw to find the active installation and upgrade it in place. Don't create a second global or shared copy. Re-running initialization adds the new safety fields without replacing your configured Prompt, persona, or runtime files.
OpenClaw should now create a separate runtime directory and ask for the store name, public storefront URL, default language, time zone, support Gmail account, order system, and policy source. One question at a time. It should validate each answer before moving on, not hand you a long form to fill in.
You can use a public store URL if you aren't ready to connect your own store. The Skill reads public product and campaign pages plus shipping, return, and refund policies when those pages exist. If the normal fetch fails, it can fall back to a read-only browse/browser route. This doesn't open the Shopify admin or expose orders and customers; it only imports information already visible to a shopper.
When the fetch finishes, ask OpenClaw to show the detected platform, product count, policy sources, campaign evidence, and warnings. Check the domain and the results before continuing. No public storefront is also a valid answer, but it must be recorded as none. Don't use someone else's URL as a production source. Keep this phase in draft_only.
The point that blocks most setups is the OAuth client-secret JSON. Here's the Google Cloud sequence I used.
3. Create Google OAuth step by step
3.1 Create a project
Open the Google Cloud home page and create a project. Use a name you'll recognize later. I chose My customer service.
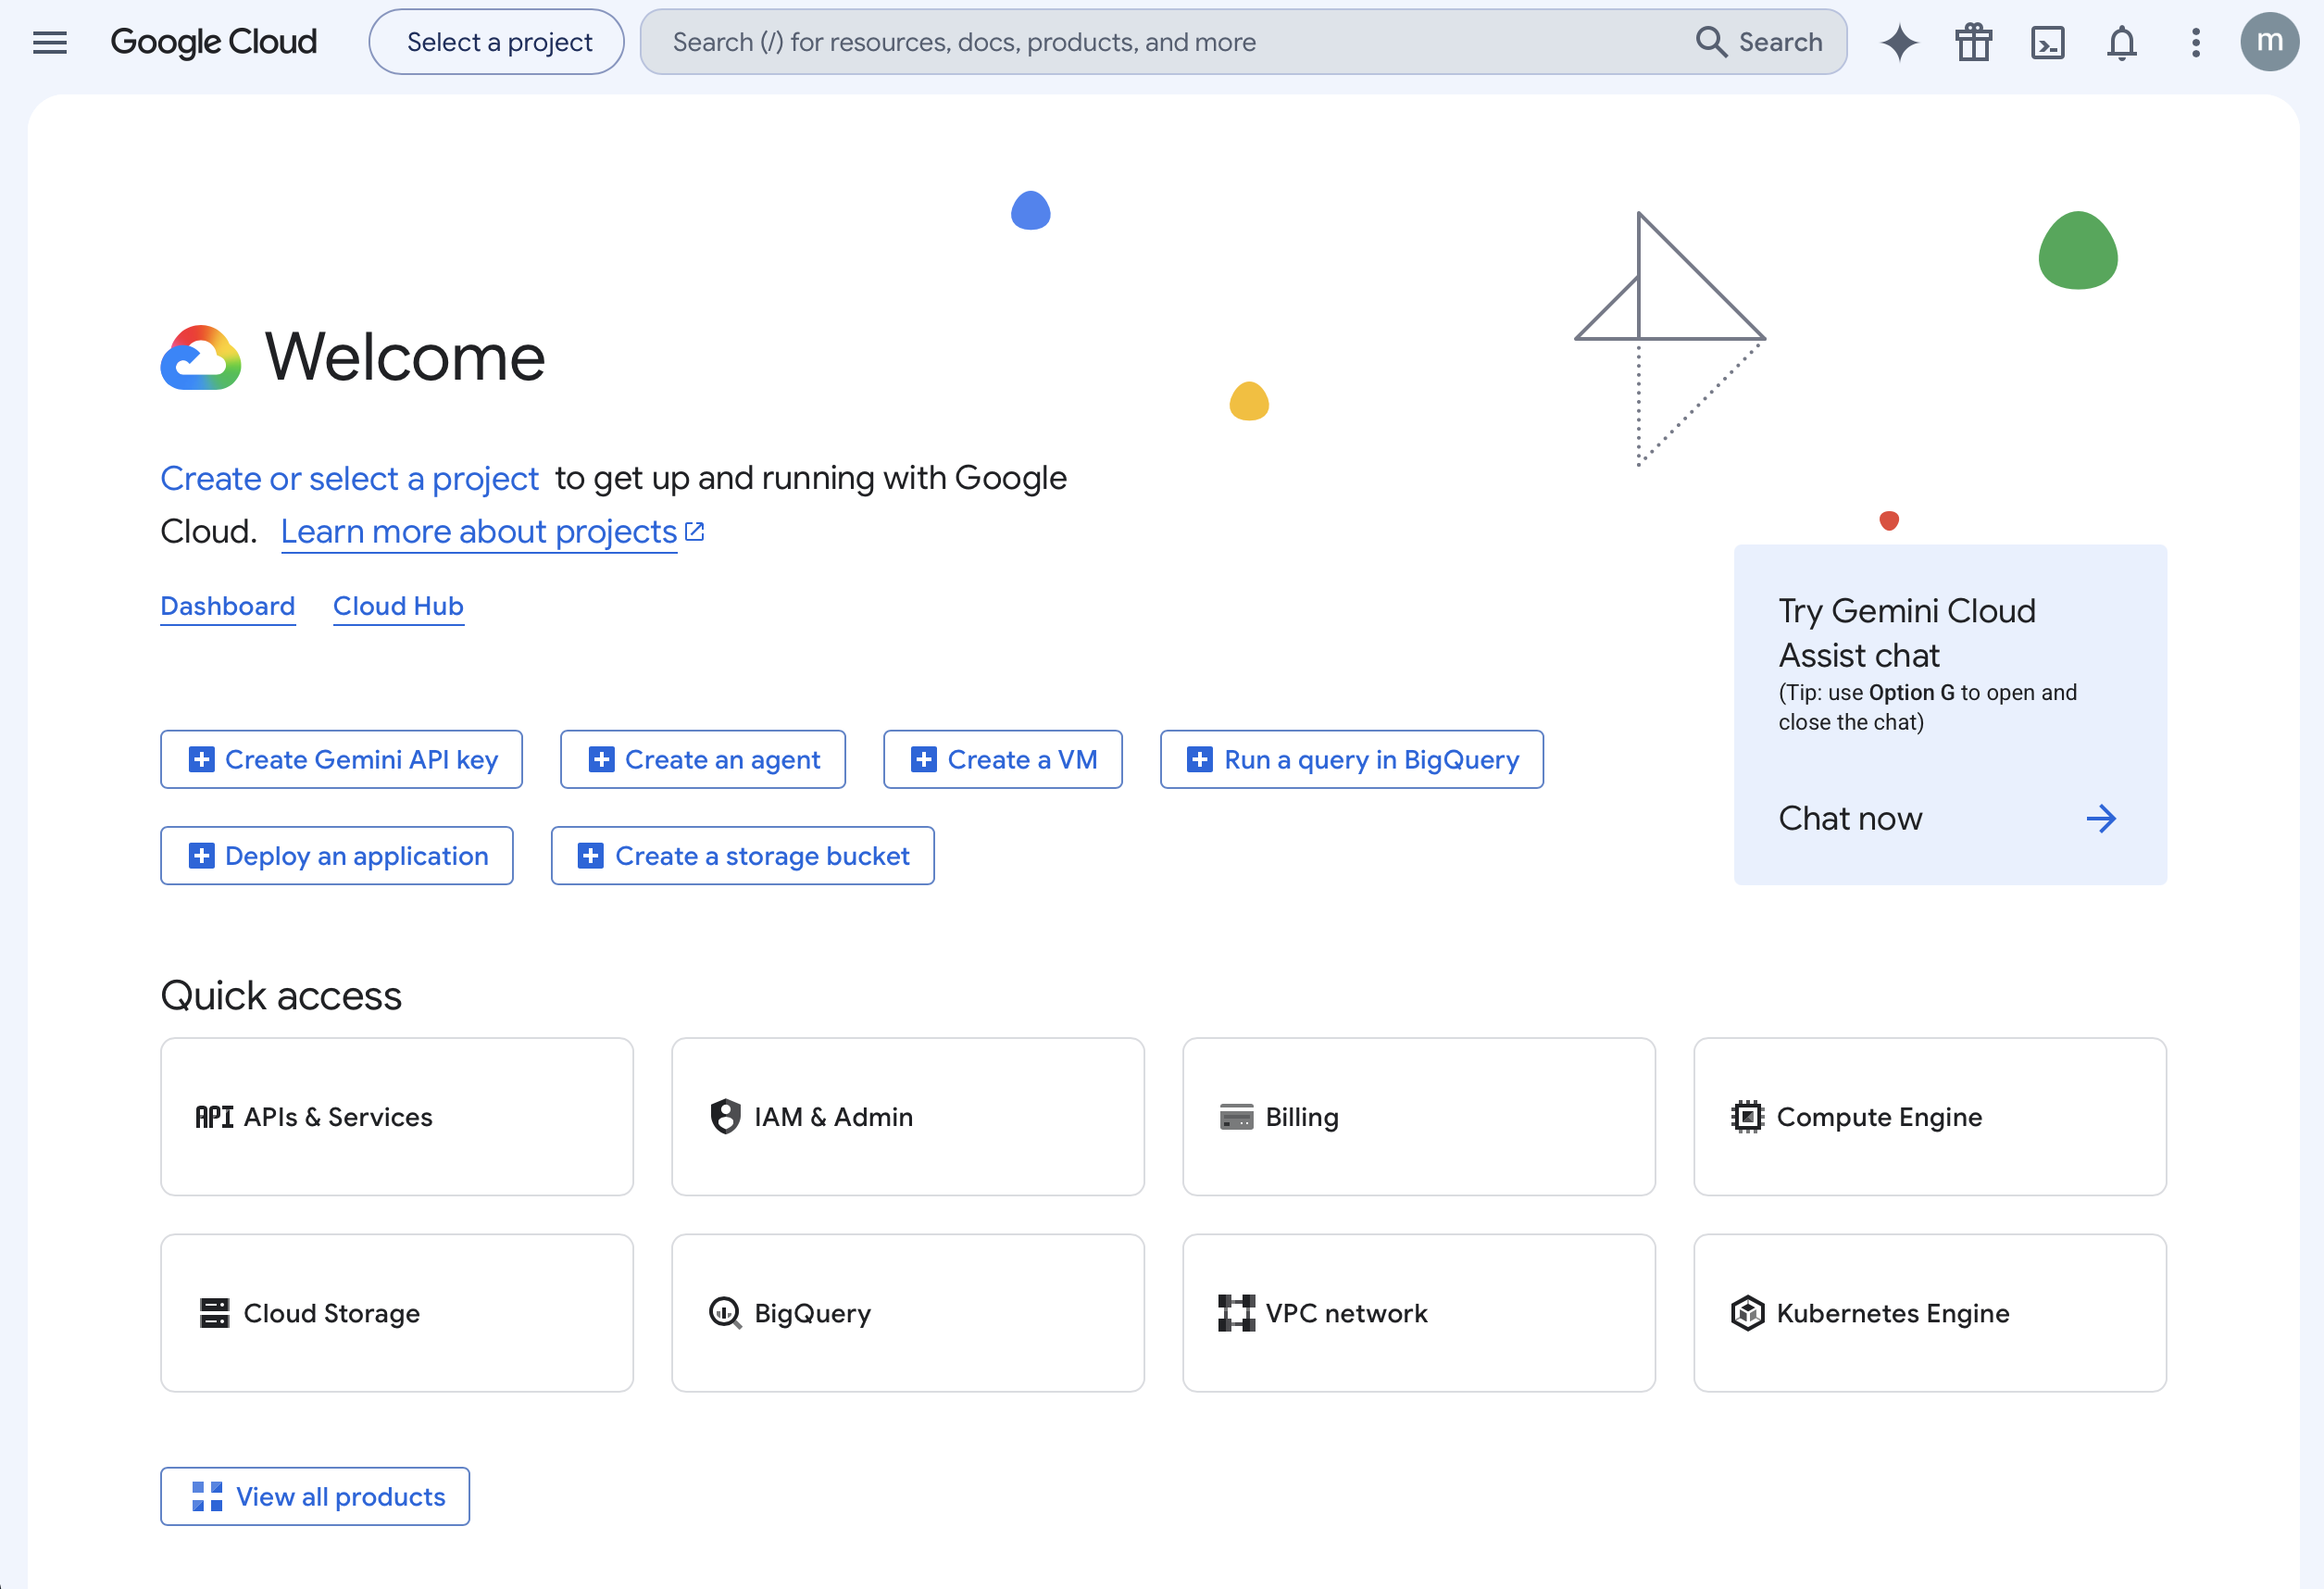
Figure 1: On your first visit to Google Cloud, click Create or select a project. Enter the Project name on the next screen; I used
My customer service.
3.2 Enable the Gmail API
Next, open the Gmail API page. Check the project shown at the top before clicking Enable; switching projects by accident is an easy way to lose time. There is nothing else to configure on this screen.
The Gmail API has per-minute and daily quotas. The default allowance is usually enough while you're testing with a small support inbox. For a busy mailbox, check actual usage on the Quotas page instead of estimating it.
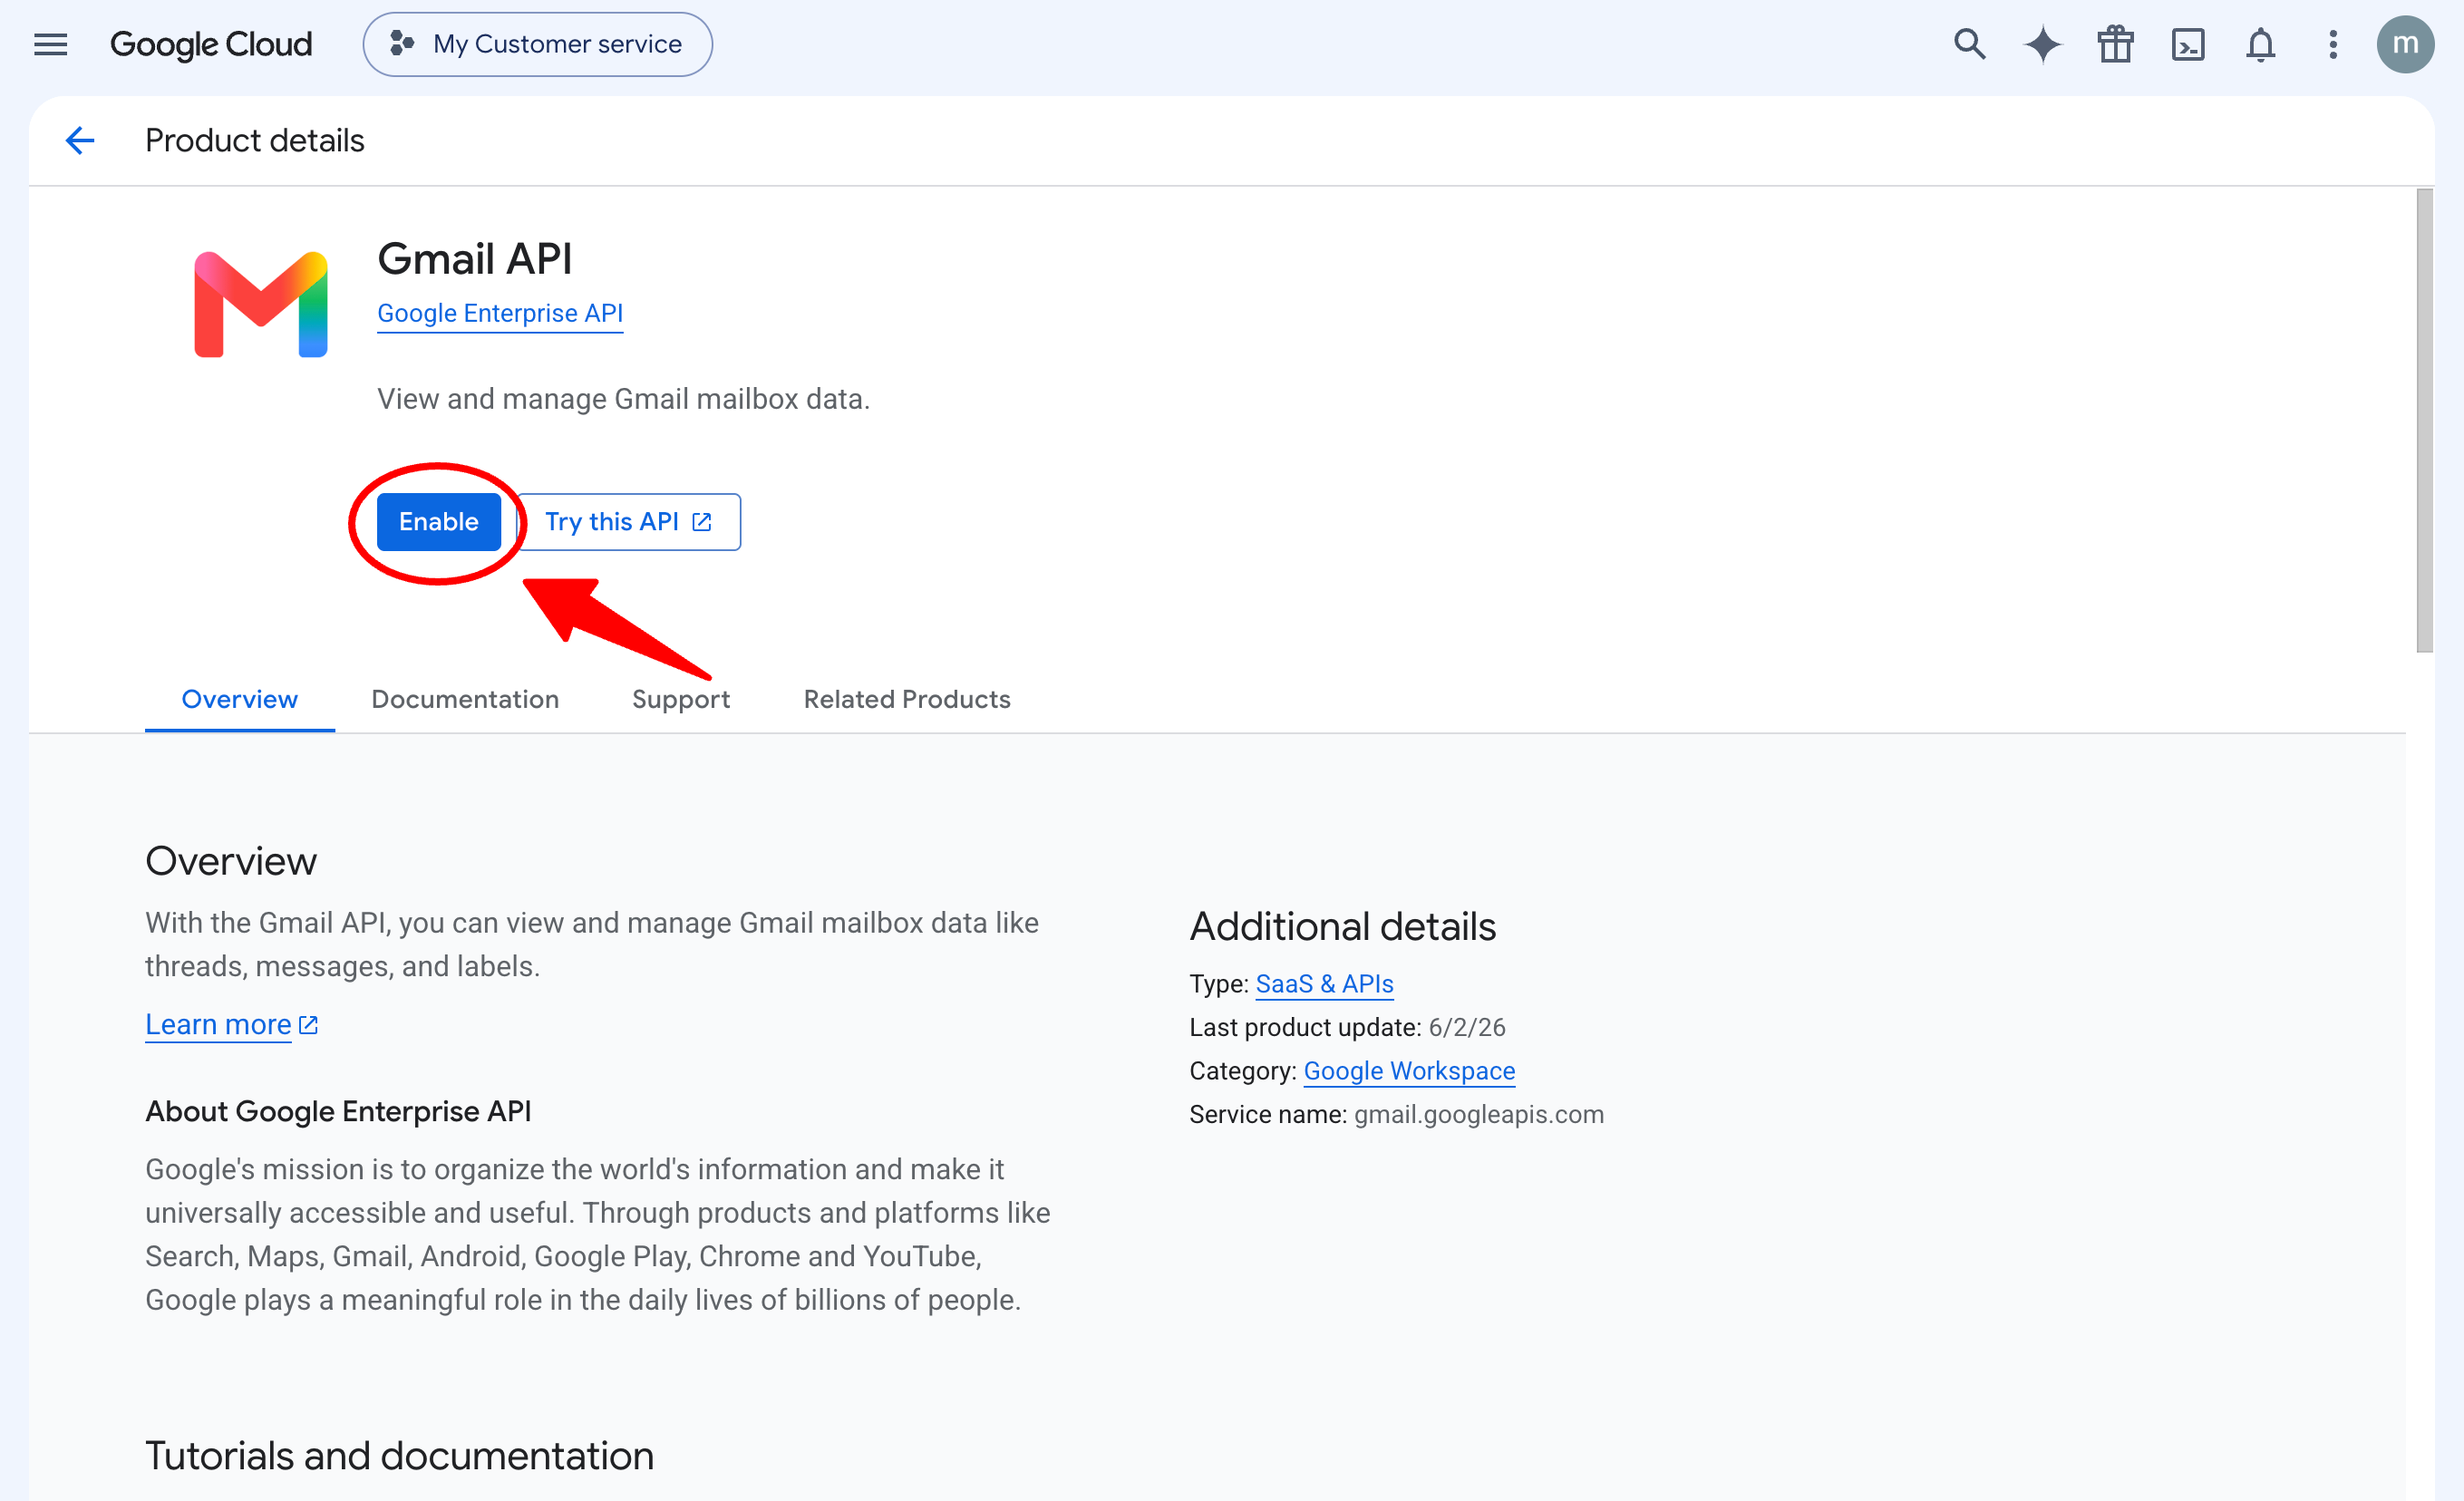
Figure 2: Confirm that
My Customer serviceappears in the top-left corner, then click Enable below Gmail API.
3.3 Configure Google Auth Platform
Open Google Auth Platform Overview. On the first visit, click Get started and enter the App name, User support email, and Developer contact information.
For a personal test, add the support Gmail account you plan to authorize under Test users. Google Workspace users may also see an Internal / External choice. Use Internal when everyone using the app belongs to the same organization; personal Gmail and accounts outside the organization usually require External.
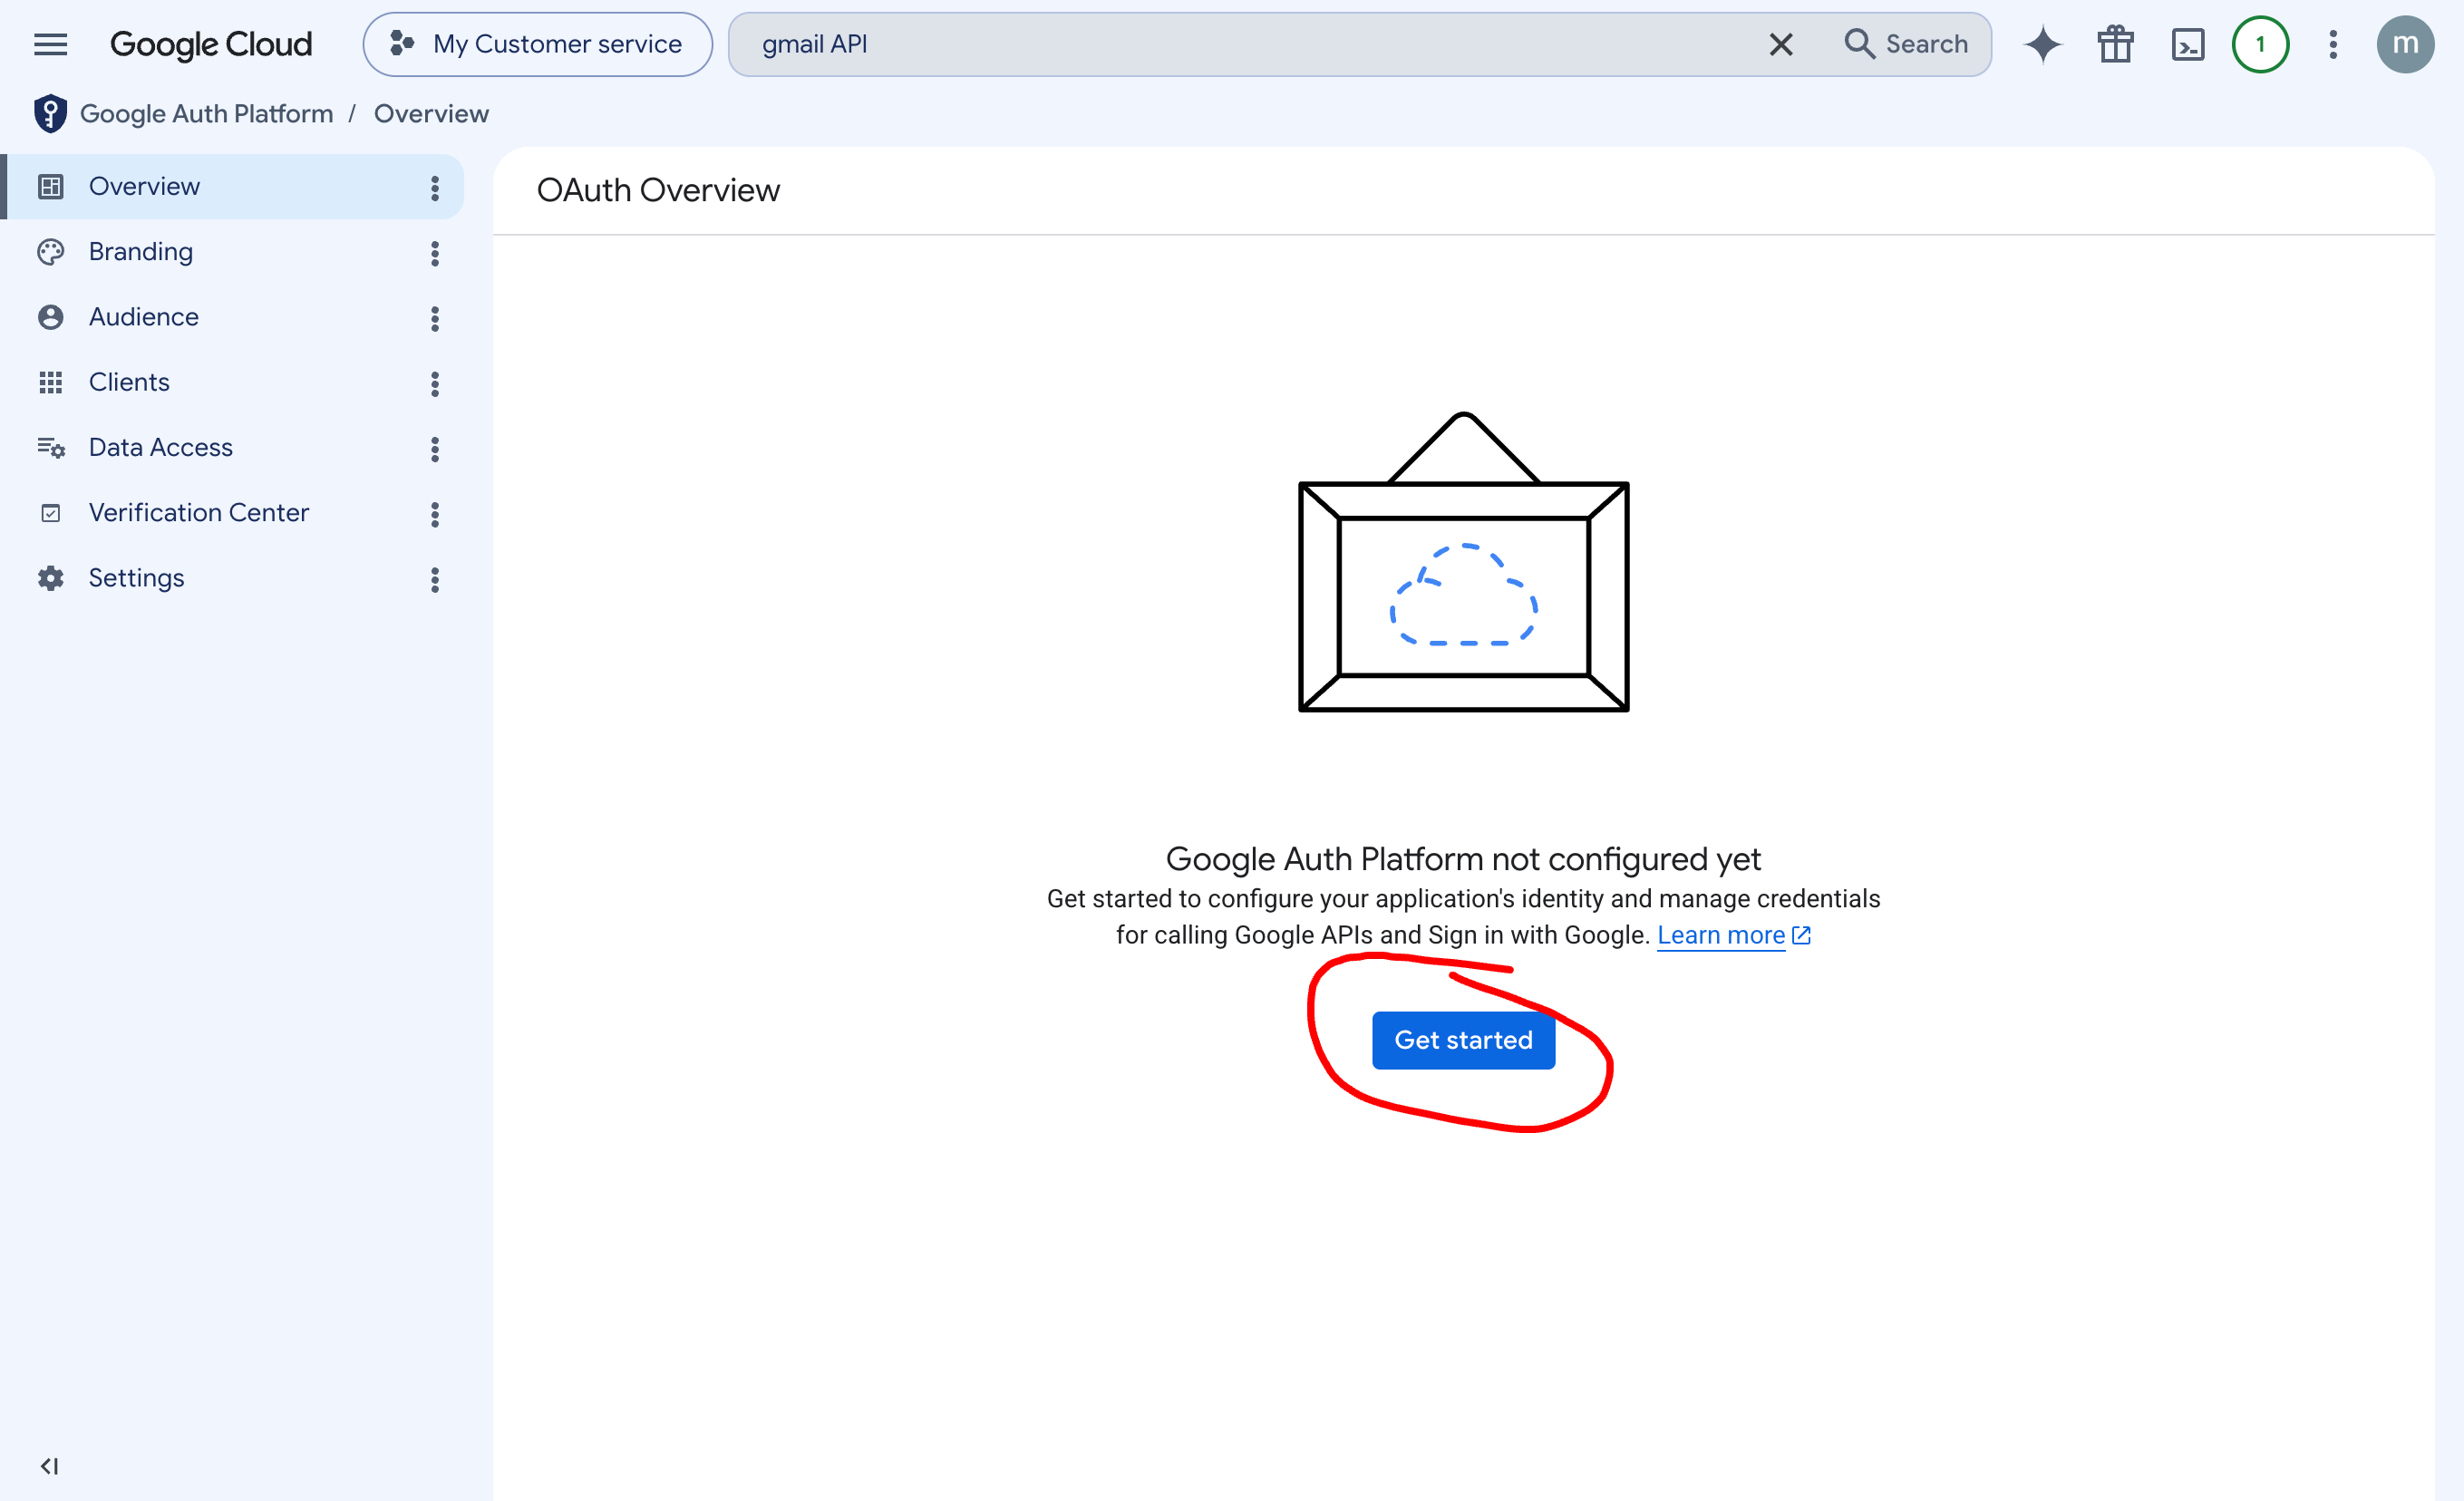
Figure 3-1: If Google Auth Platform has not been configured, click Get started first.
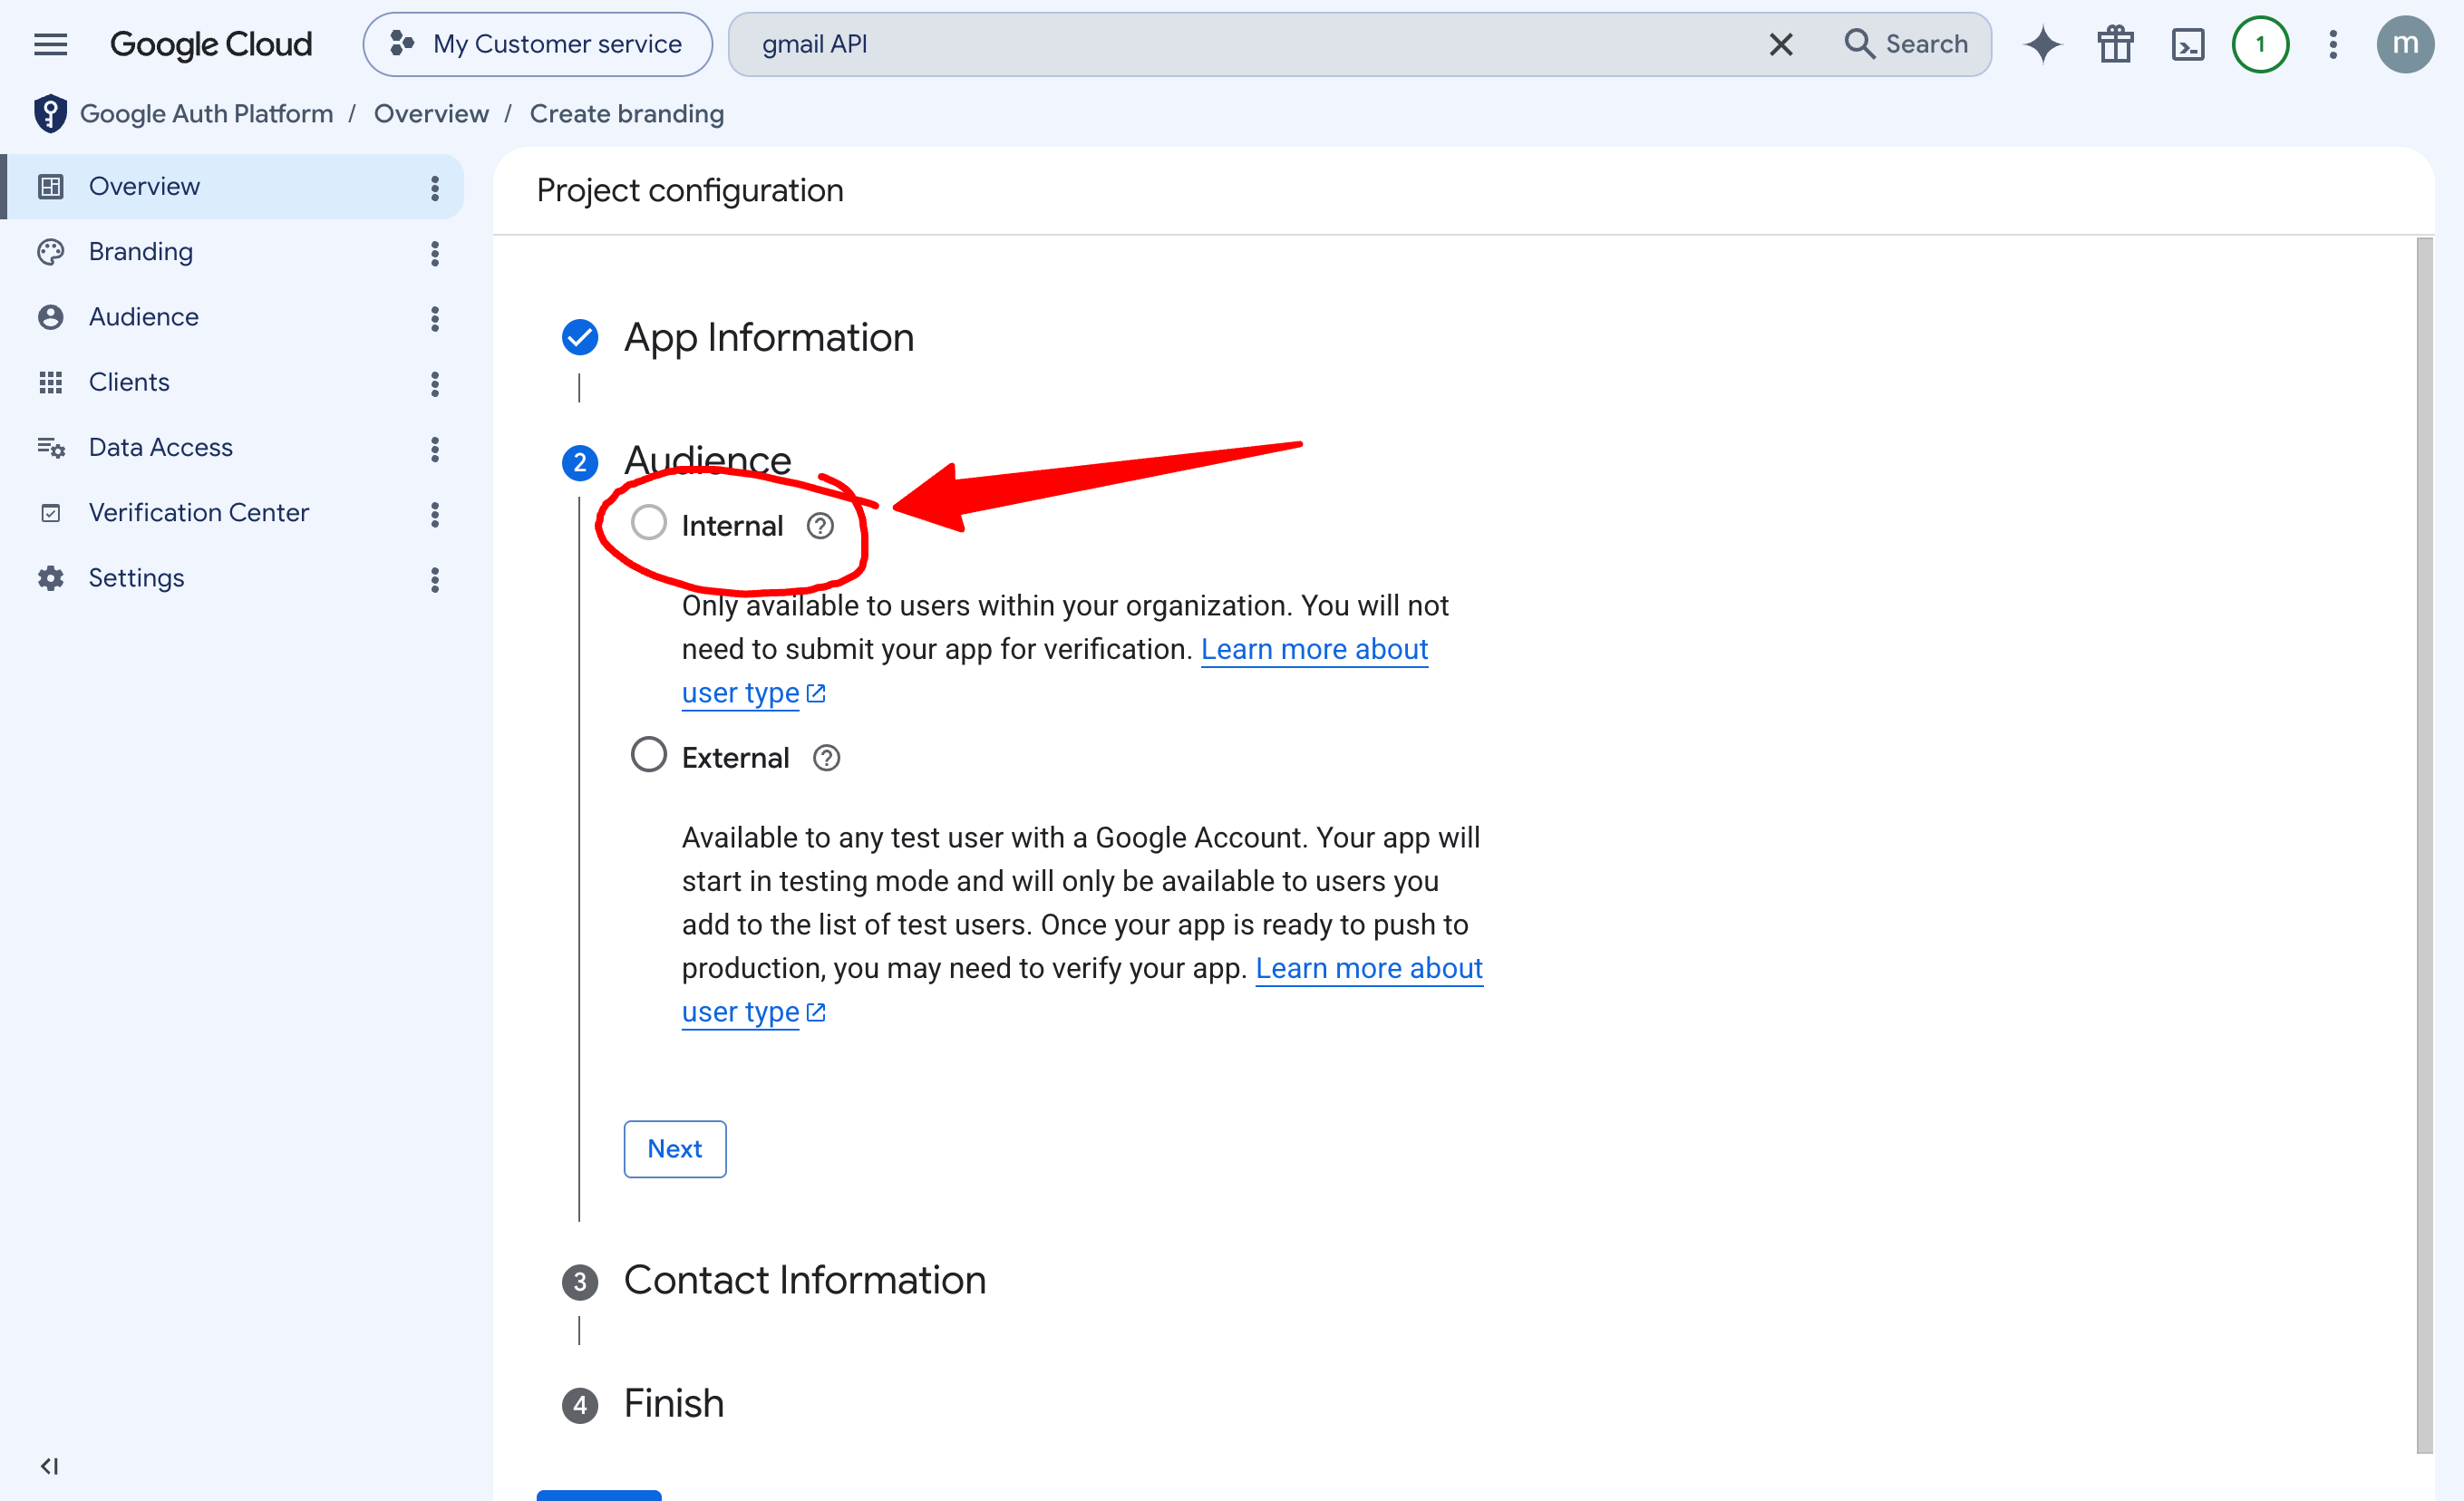
Figure 3-2: Choose the Audience. Internal works for use inside one Google Workspace organization; a personal Gmail account or an external account generally requires External.
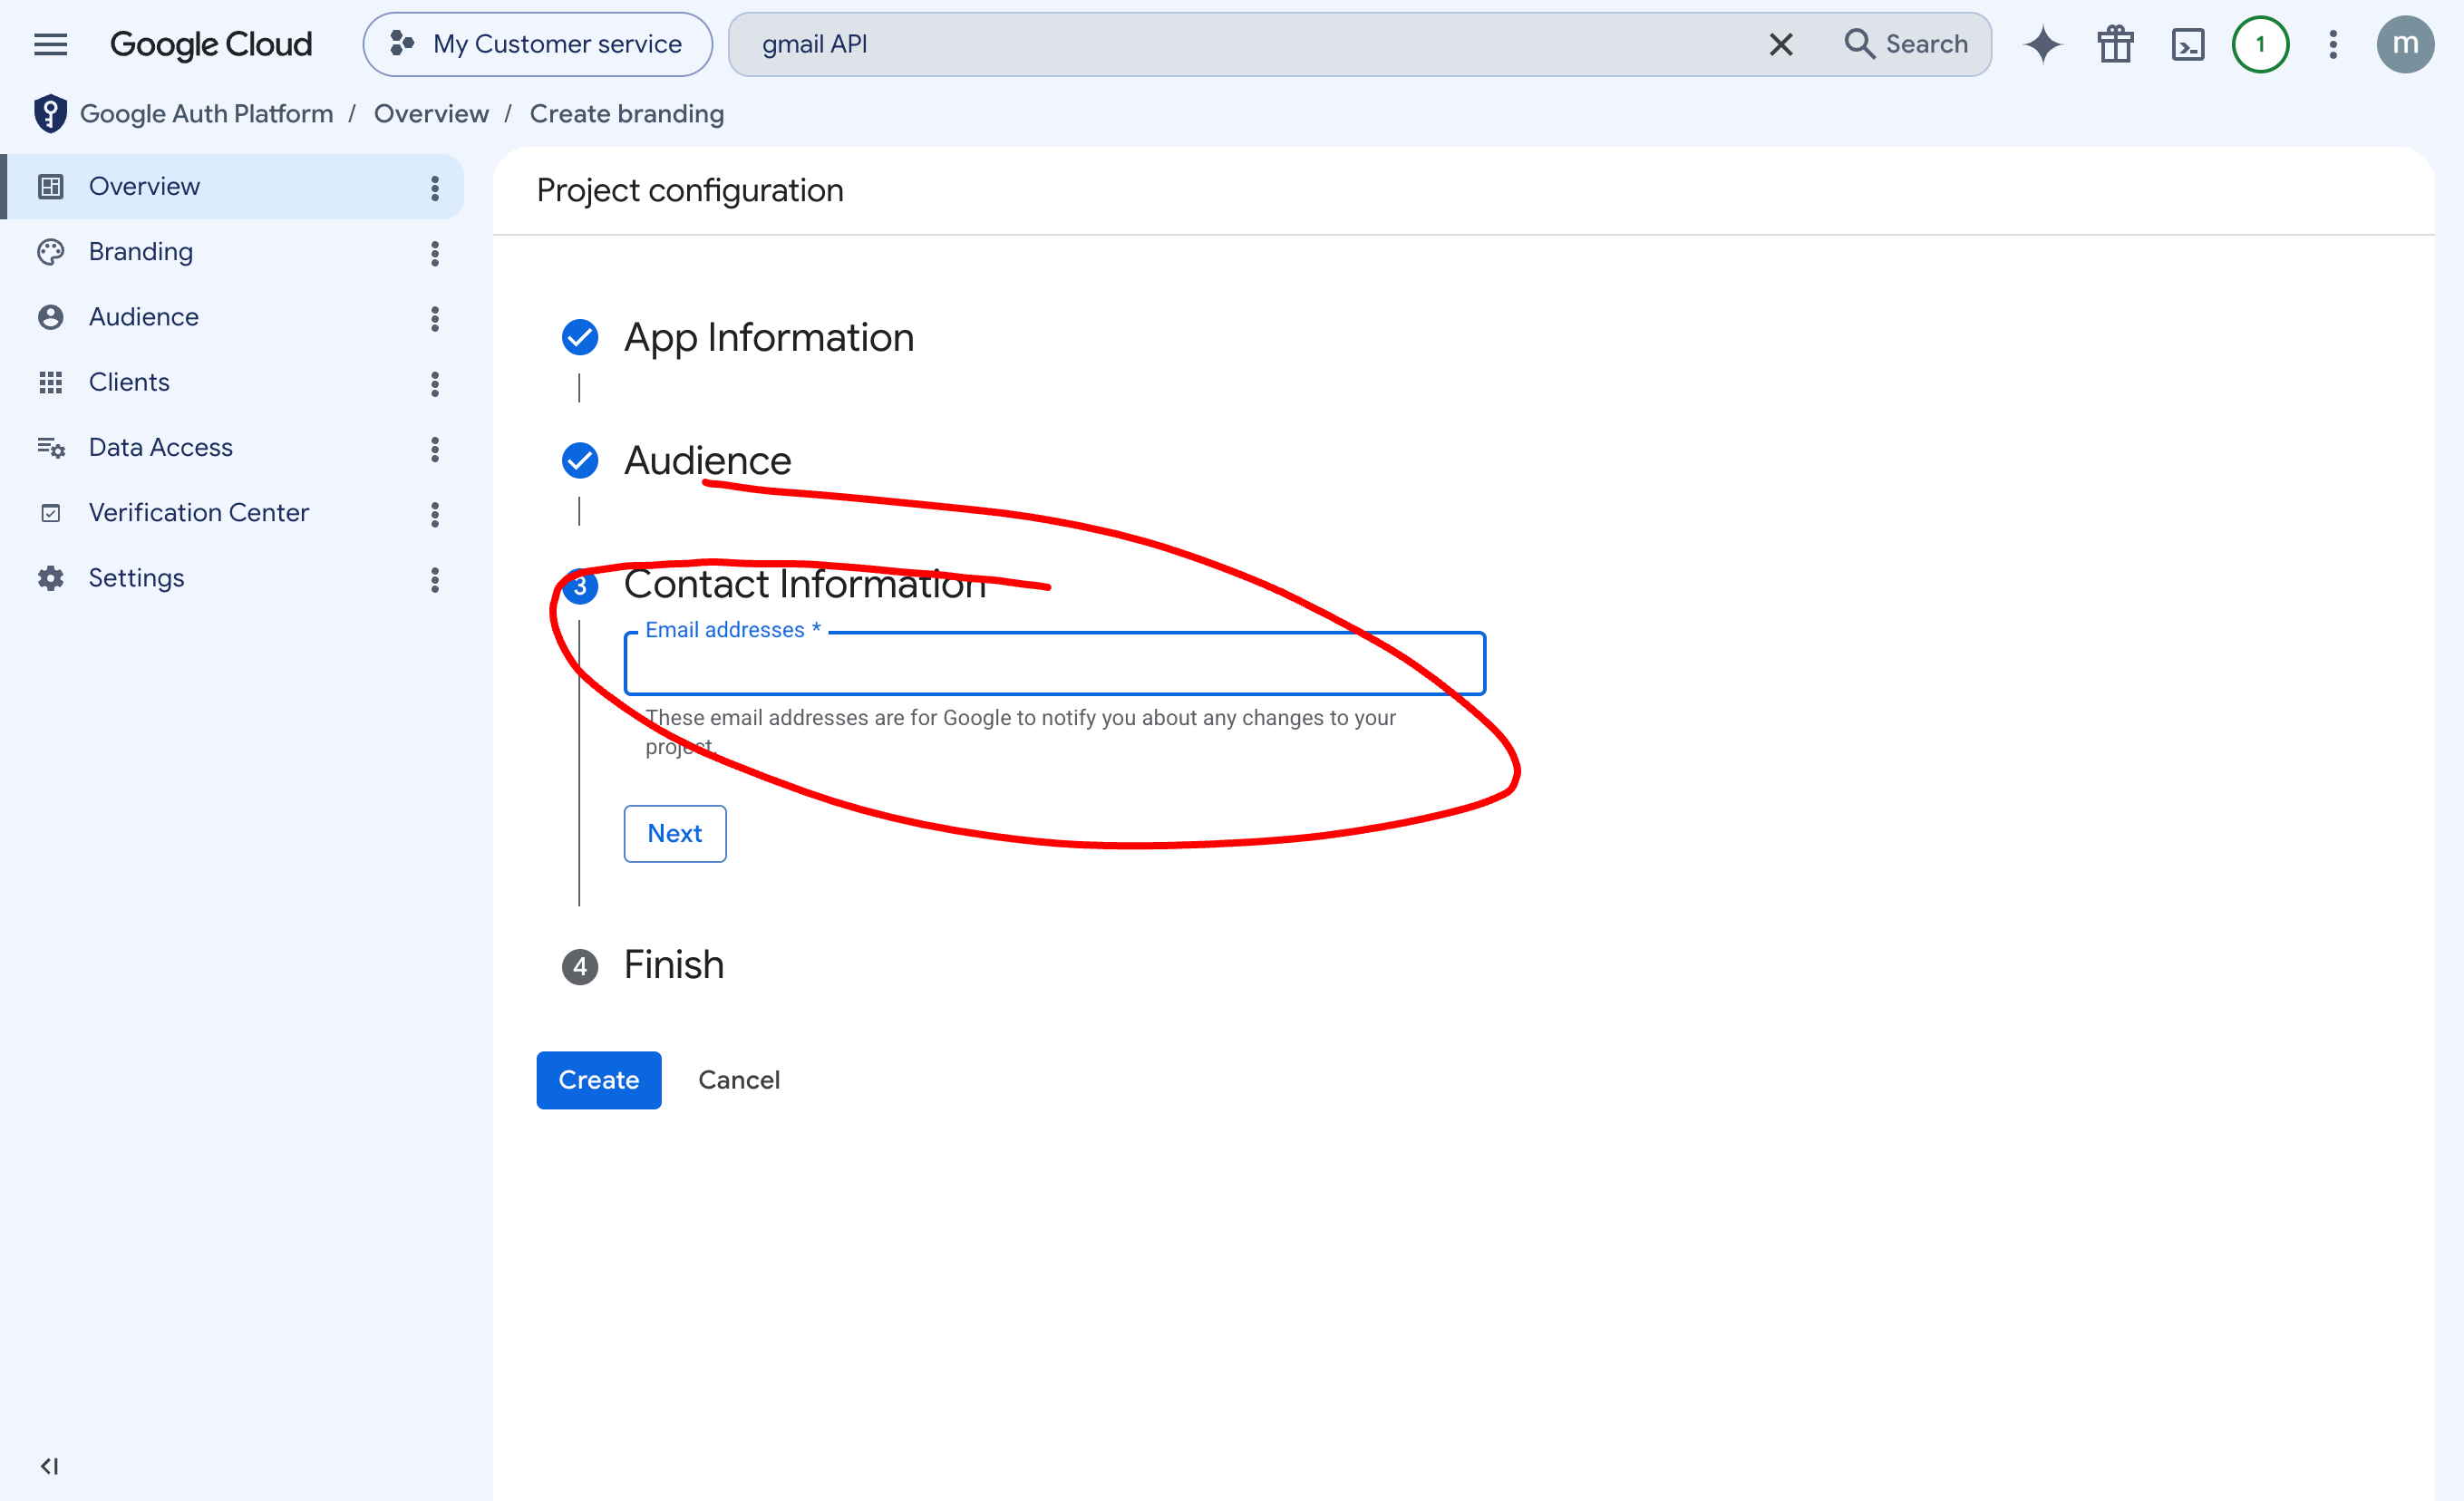
Figure 3-3: Enter the email address Google should use for project notifications, then finish creating the configuration.
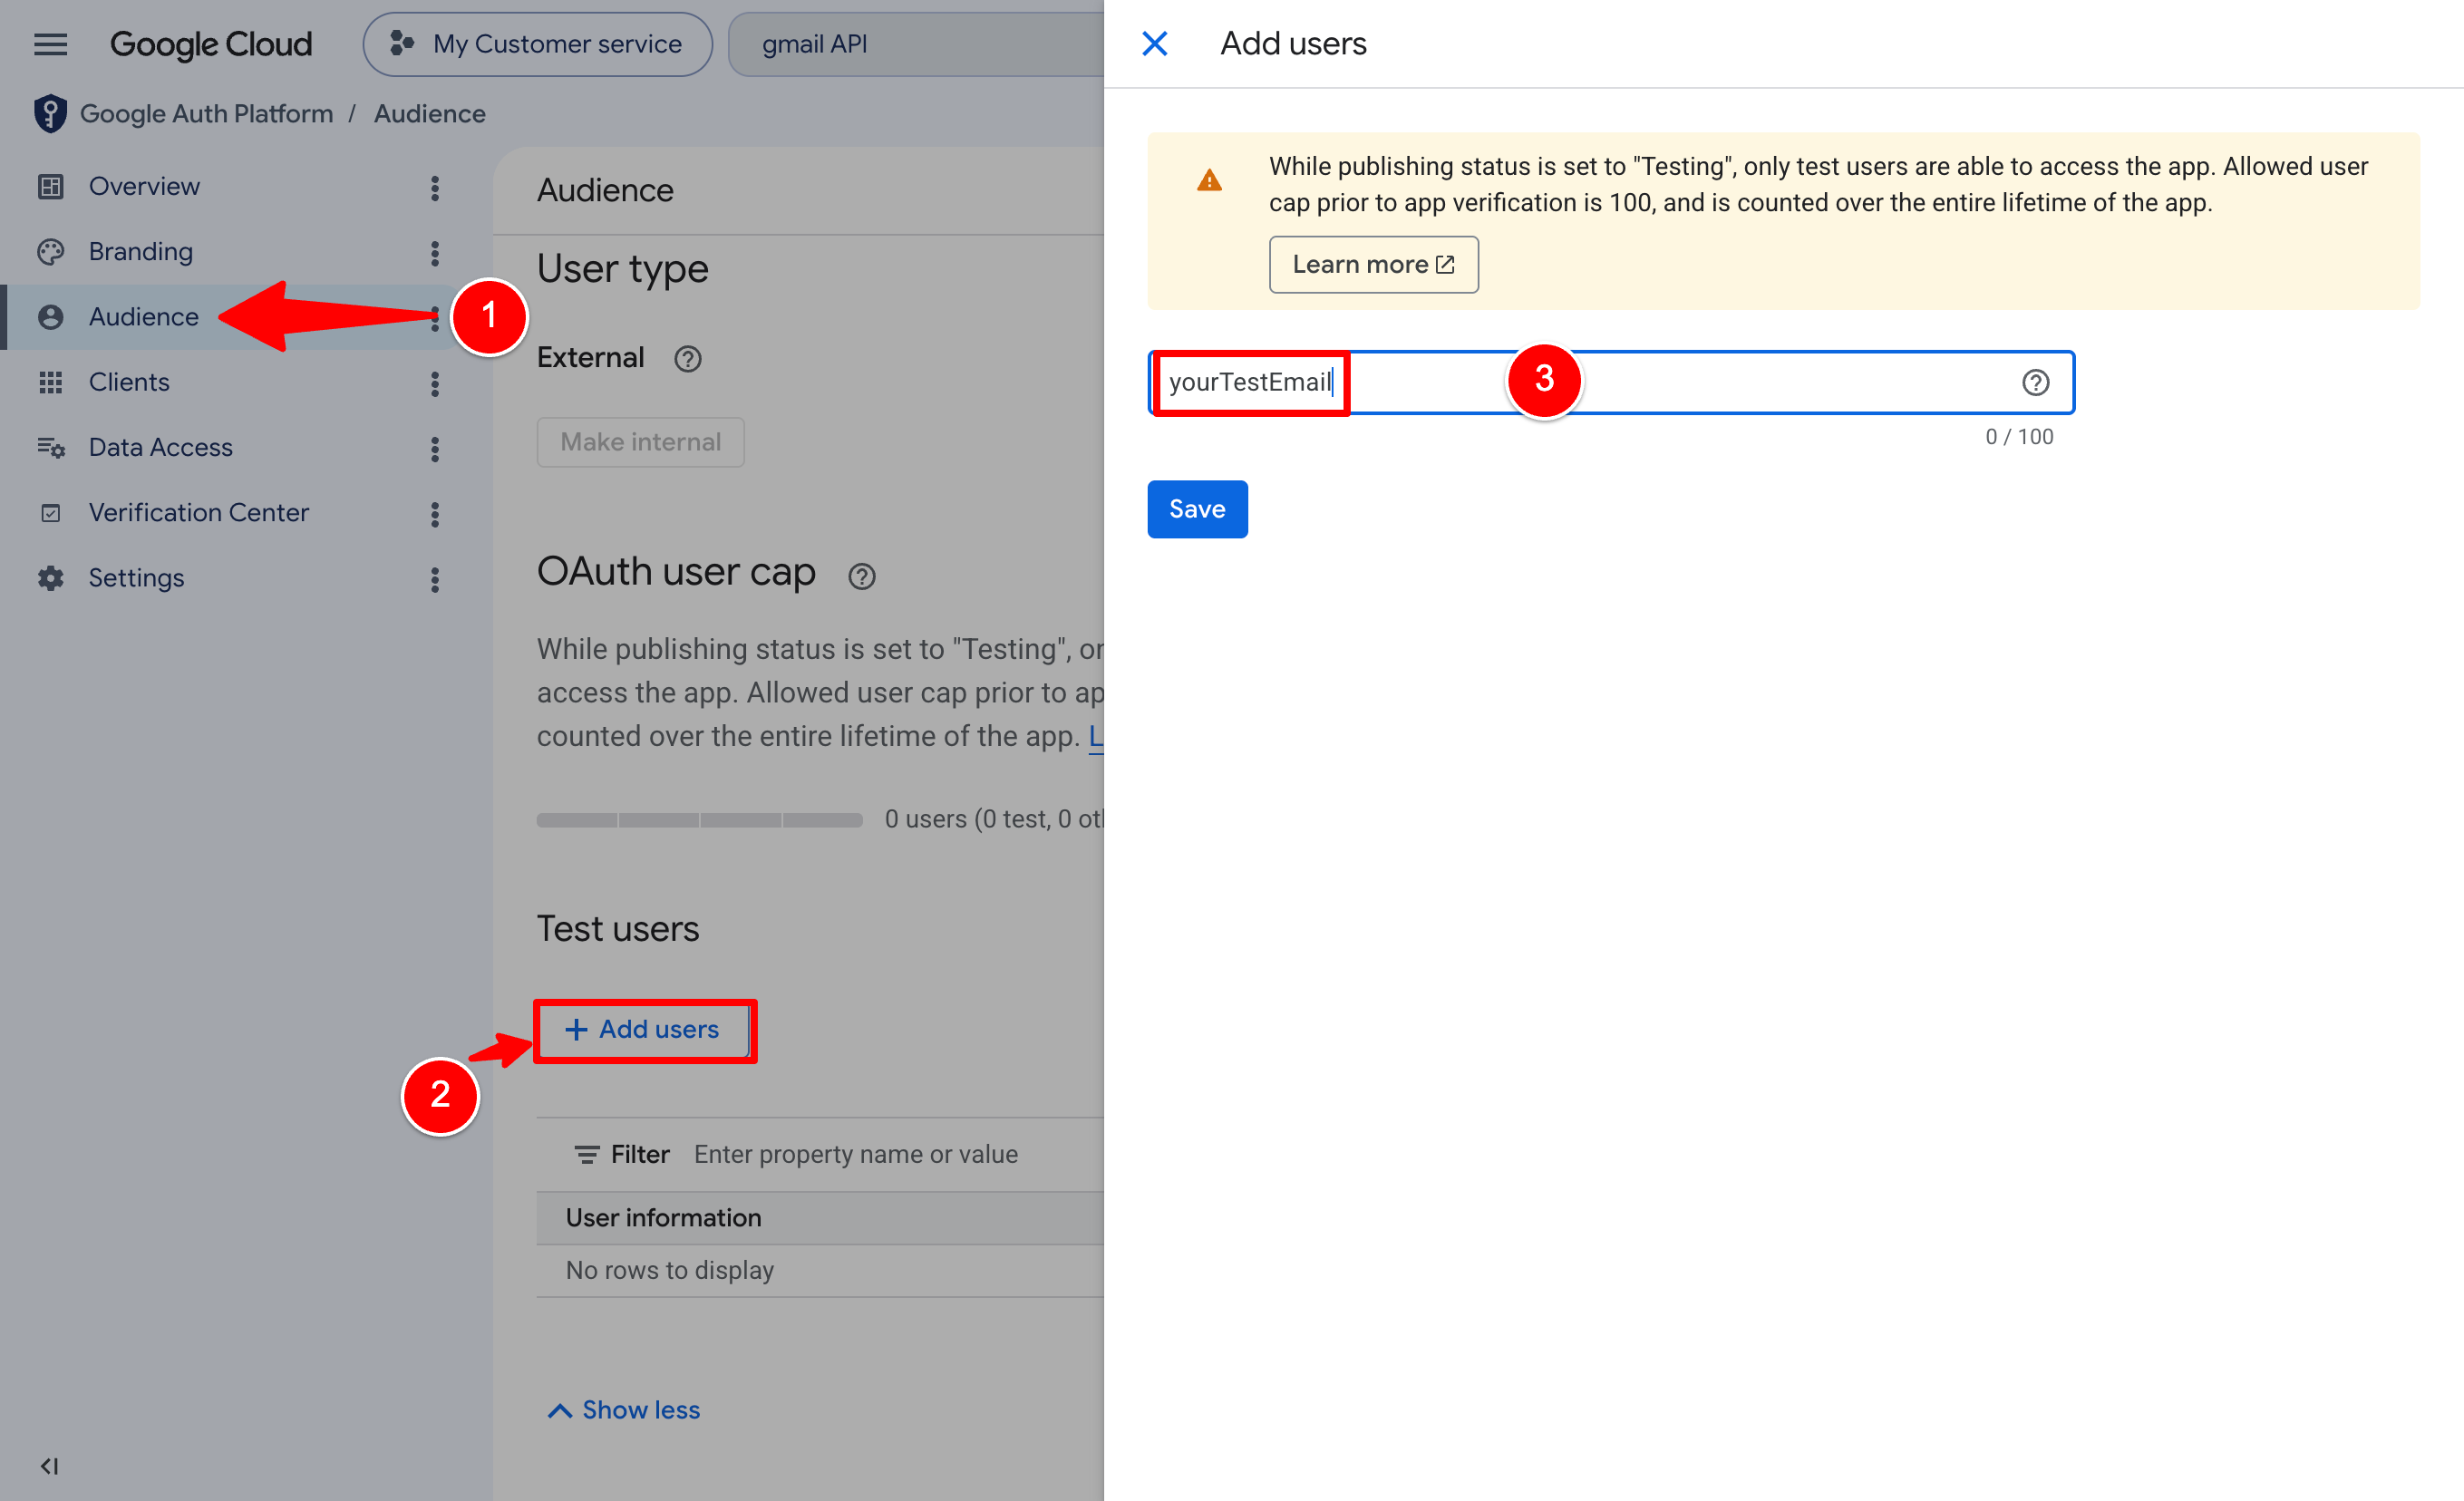
Figure 3-4: When the app is External and in Testing, open Audience, click Add users, and add the support Gmail account you will authorize.
3.4 Configure Gmail scopes
After adding Test users, save and continue to the Scopes page. Click Add or remove scopes and search for gmail. Choose scopes by the work the Skill needs to do, not by how familiar the names look.
This workflow reads messages, creates drafts, and applies labels. These are the Gmail scopes you'll commonly see:
https://www.googleapis.com/auth/gmail.compose: manage drafts and send email.https://www.googleapis.com/auth/gmail.send: send email only.https://www.googleapis.com/auth/gmail.modify: read, compose, and send email; change labels and move messages to trash, but not permanently delete them without going through trash.https://www.googleapis.com/auth/gmail.drafts.create: create reply drafts.https://www.googleapis.com/auth/gmail.labels: view and edit labels; the Skill uses labels to classify messages.https://mail.google.com/: read, compose, send, and permanently delete all Gmail messages. This is the broadest permission.
Don't tick every result, and don't treat the narrower scopes plus https://mail.google.com/ as a required bundle. In the v1.2.8 onboarding covered here, gog uses the full Gmail scope because the complete workflow reads messages, adds labels, creates drafts, and keeps the ability to send. Read-only access is enough for analysis, but not for the full draft workflow. The official Gmail API scopes documentation explains the exact reach of each permission.
For store operators, the key distinction is this: draft_only is a sending rule inside the Skill. It isn't a smaller OAuth permission. The current version still creates drafts by default after receiving the full scope. Automatic sending remains off until you enable the separate global switch and approve categories one by one later.
Click Update after selecting the scopes, then save and continue.
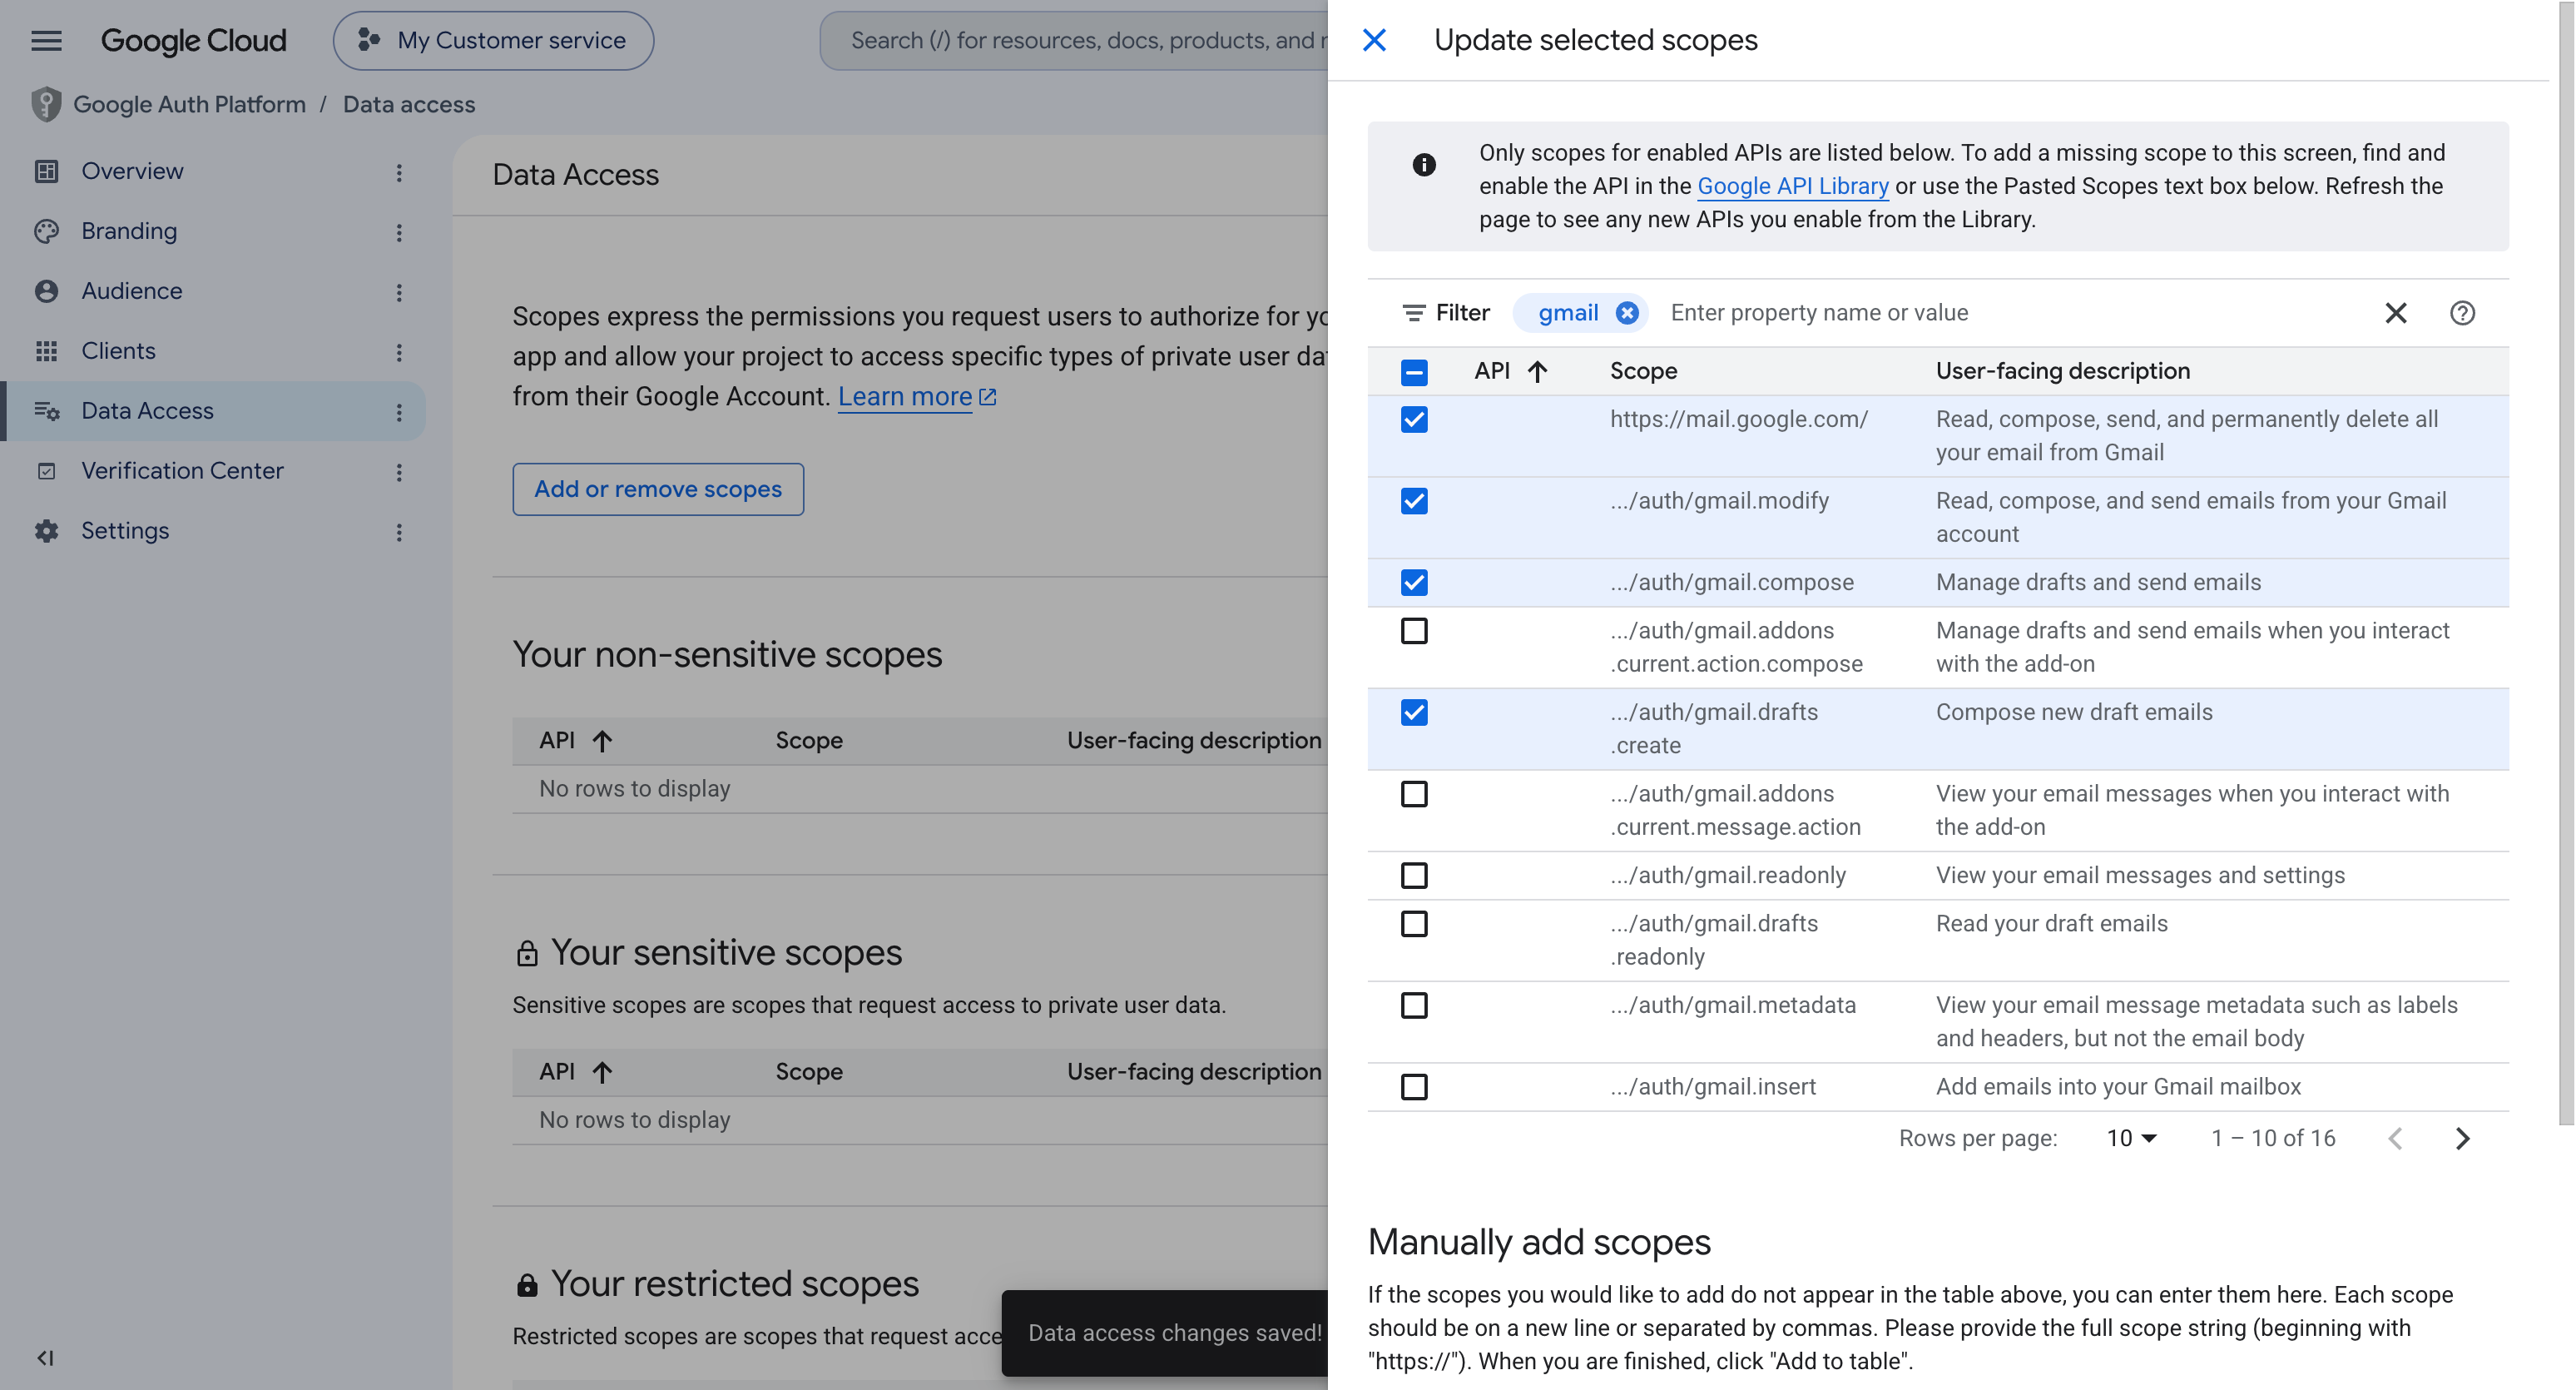
Figure 3-5: On Data Access, click Add or remove scopes, search for
gmail, select the permissions required by the current OpenClaw authorization flow, and click Update.
3.5 Create the OAuth client
Now open OAuth Clients and click Create client.
This choice is easy to make on autopilot. Website OAuth often uses Web application, but this Skill asks gog to authenticate Gmail on the local machine. The default onboarding therefore uses Desktop app. It receives the authorization result locally, so you don't enter an Authorized redirect URI.
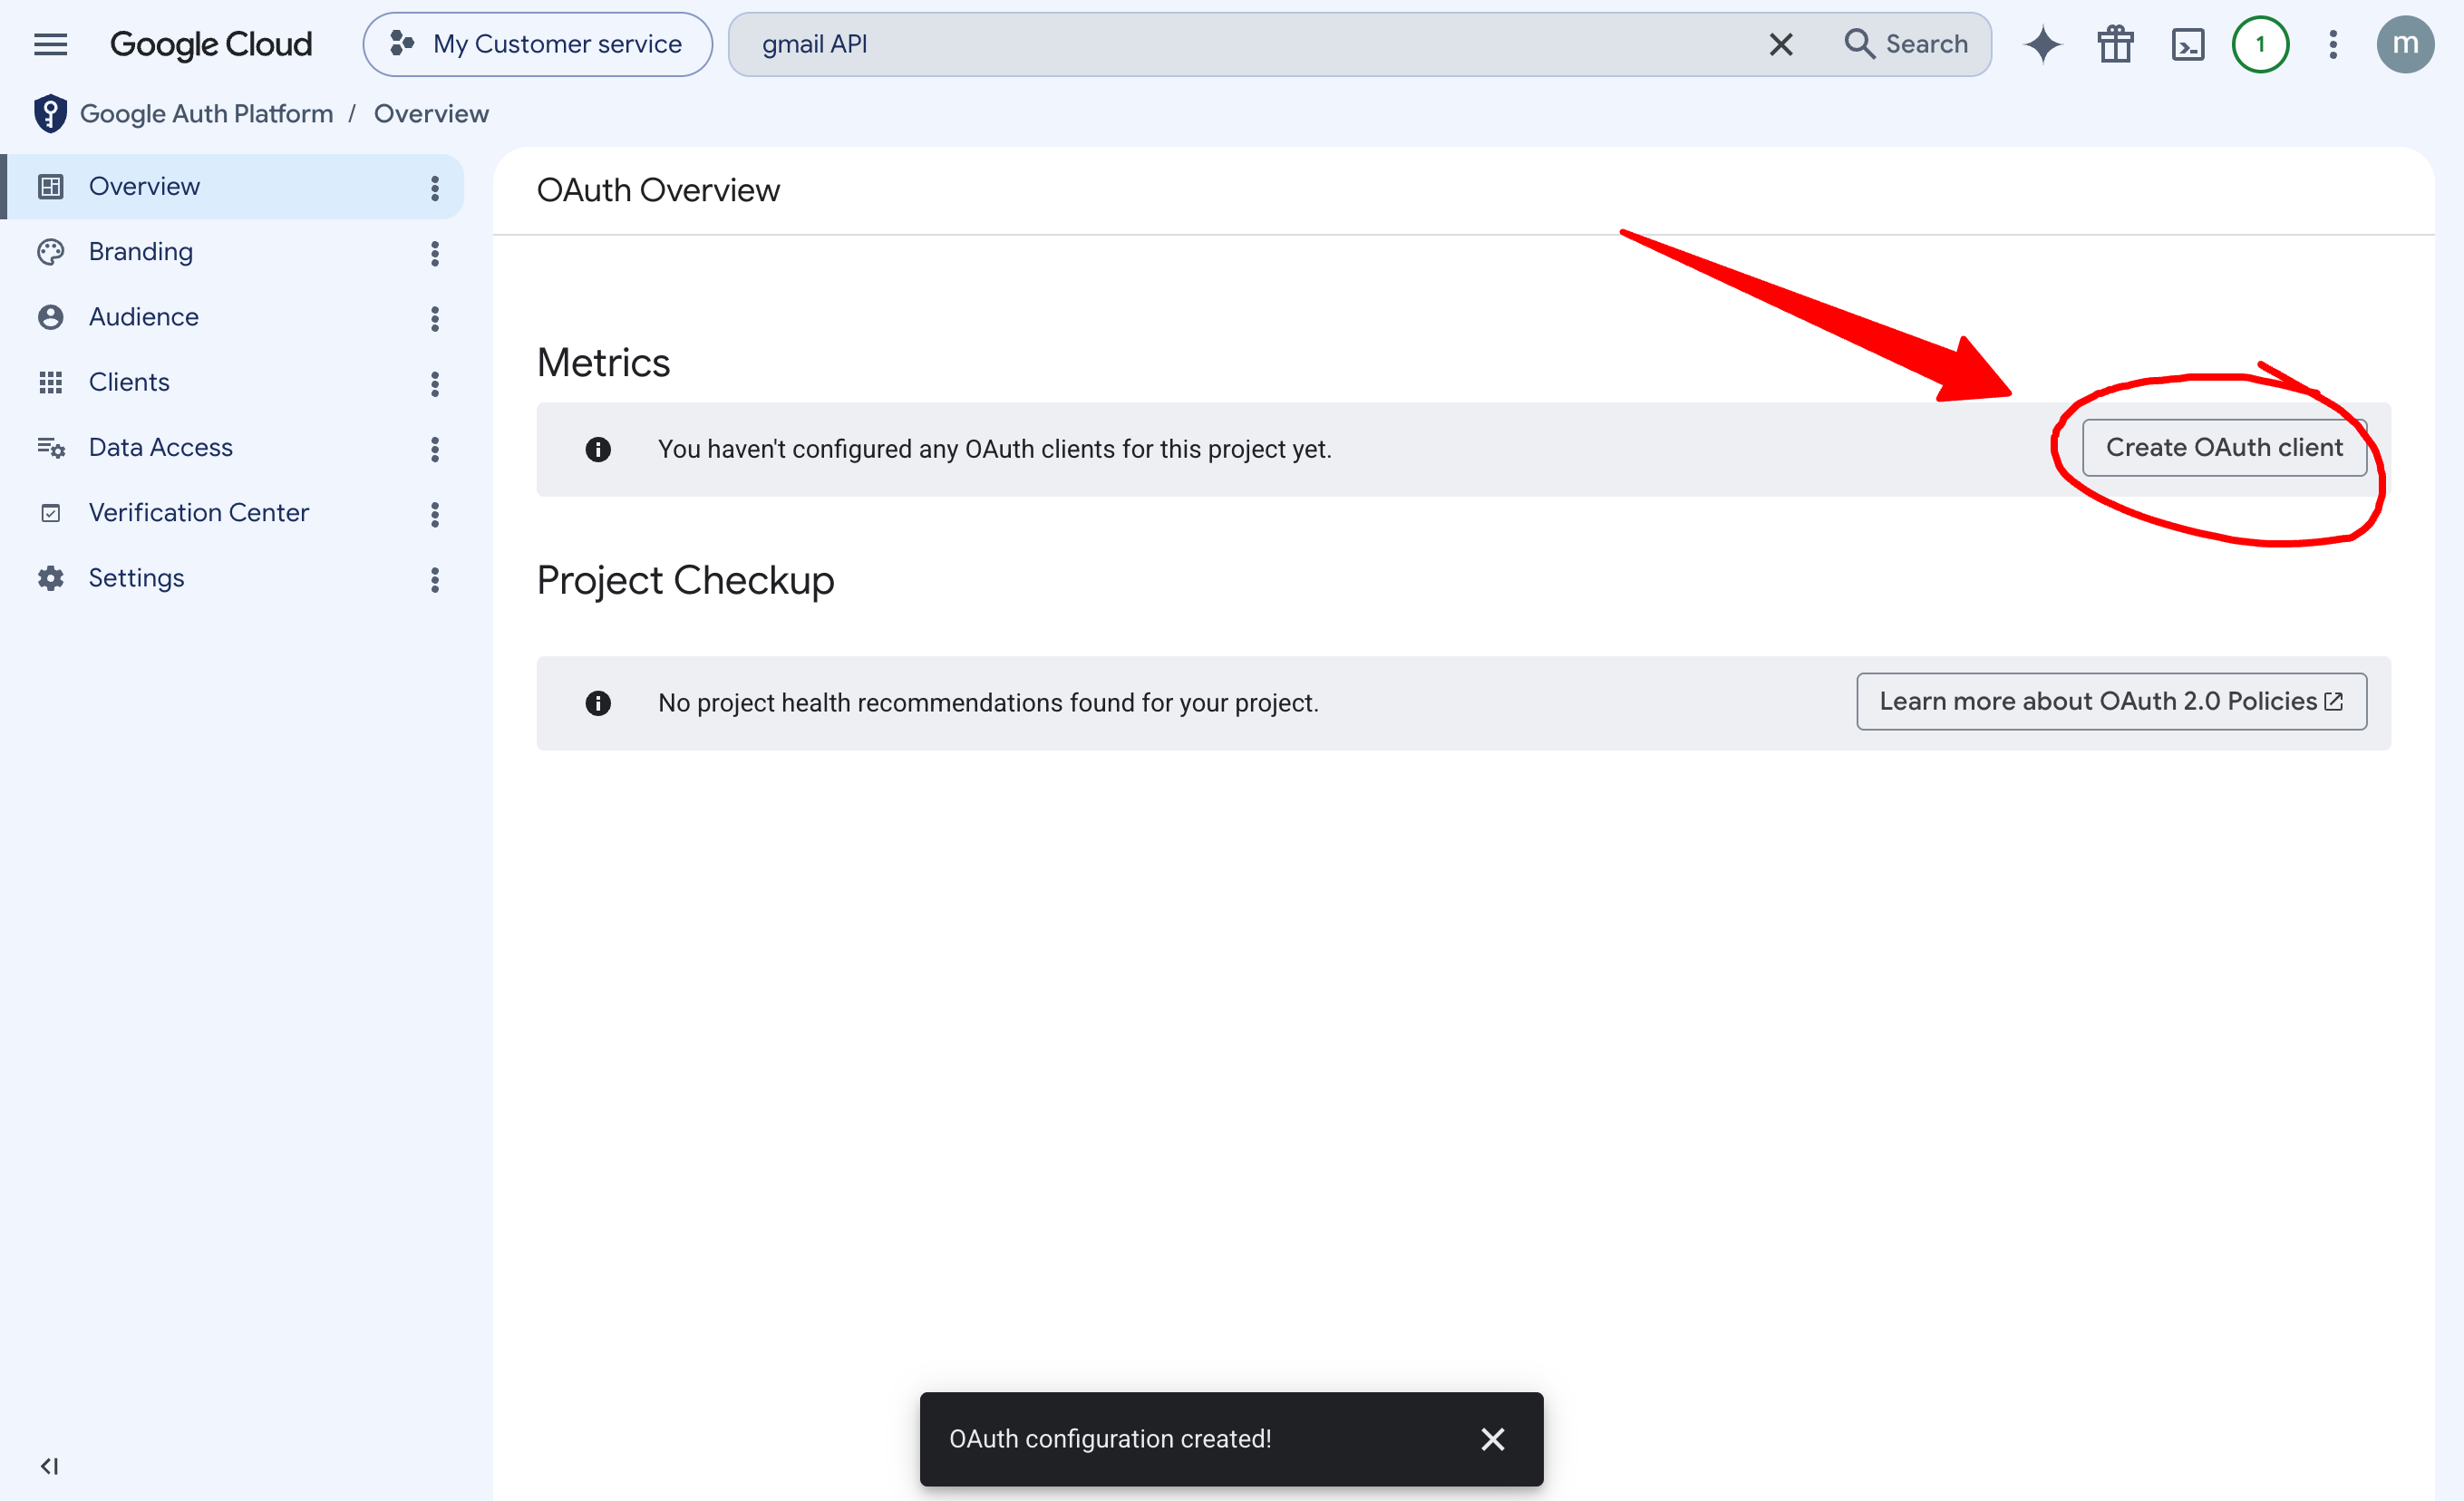
Figure 4: After the OAuth configuration is ready, click Create OAuth client. On the next page, choose Desktop app for the default local flow and give it a recognizable name, such as
OpenClaw Gmail customer service.
3.6 Ask OpenClaw for a redirect URI only when a remote callback is required
Choose Web application only if OpenClaw explicitly tells you that it is running on a remote server, behind a proxy, or through a tunnel and that the current authentication method needs a custom callback URL. In that case, send OpenClaw this message:
I'm configuring a Google OAuth client for OpenClaw and need a callback URL. Generate one for me so you can successfully log in using the OAuth client's client-secret JSON.
Don't paste a value into Google Cloud merely because it looks like a callback URL. Ask OpenClaw to check the current gog auth add --help, start the real authorization flow, and confirm the URI it is actively listening on or requesting. Then add that exact value under Authorized redirect URIs and click Create.
3.7 Download the JSON and tell OpenClaw only its local path
Google provides a JSON file after the OAuth client is created. Save it in a private local directory. Don't upload it to a chat, GitHub, or a shared drive.
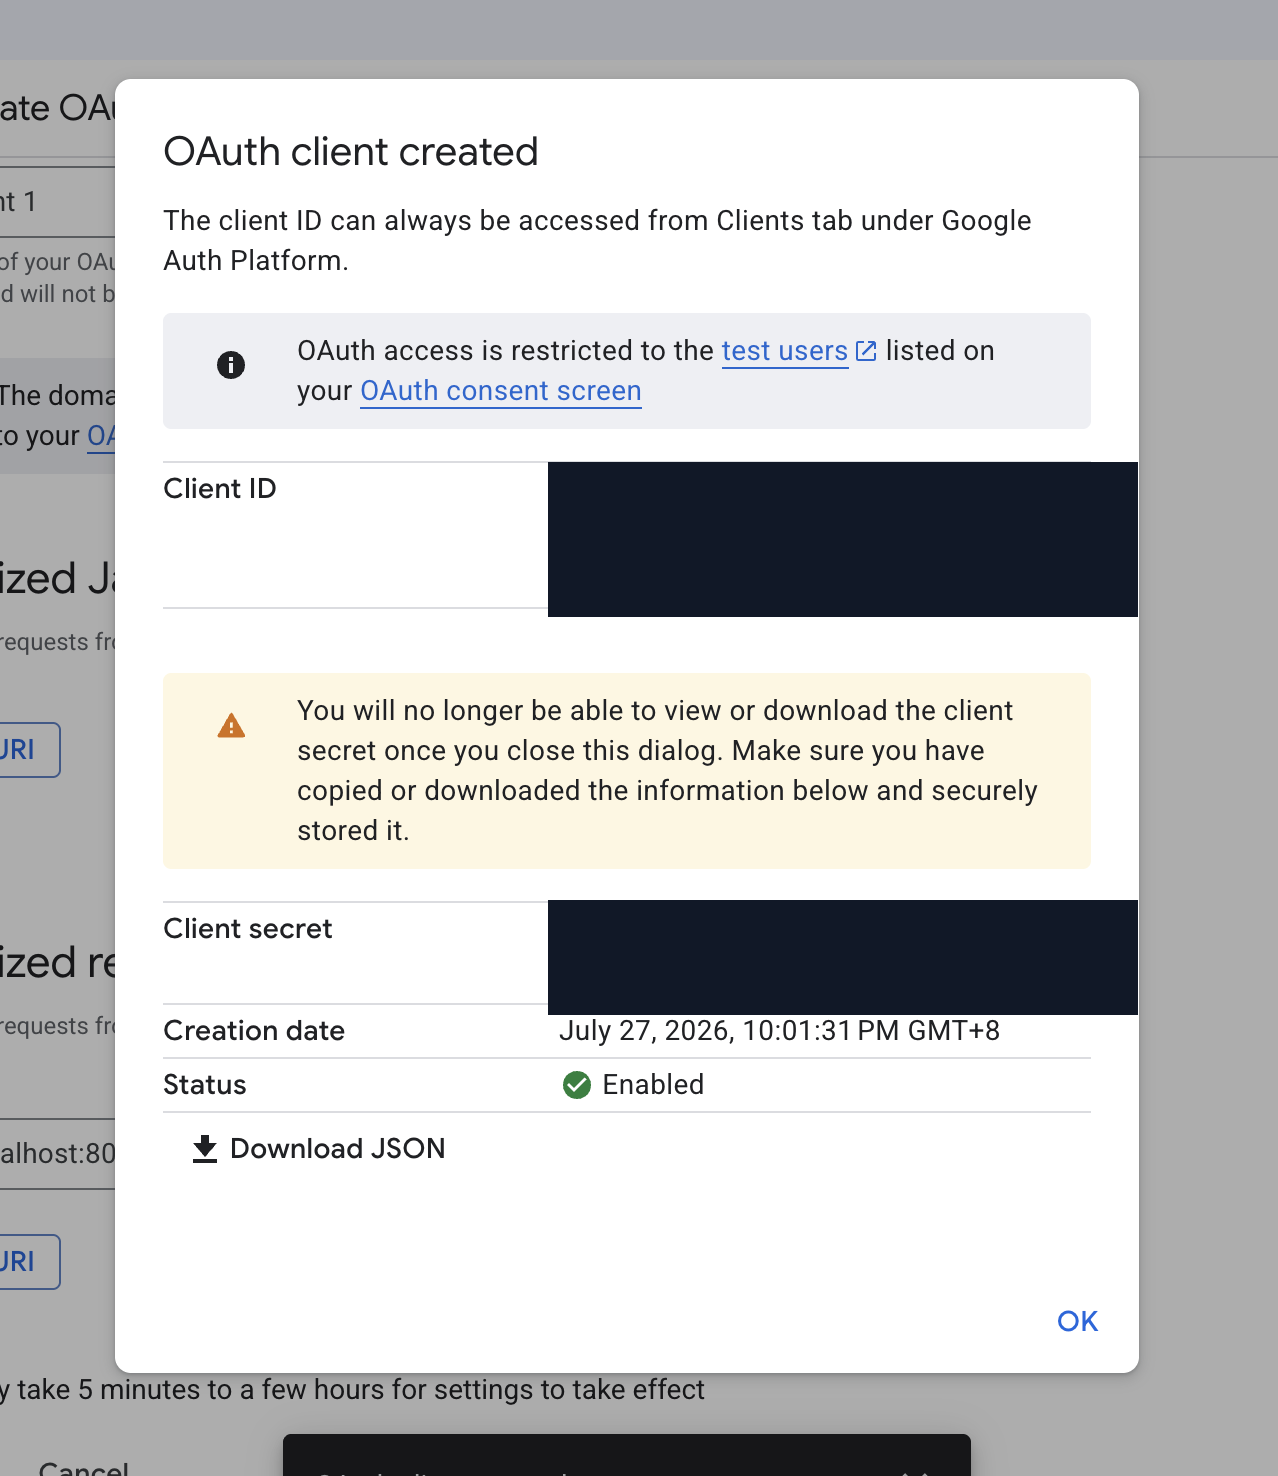
Figure 5: Click Download JSON after creating the client. This screen normally shows the Client ID and Client secret; both are redacted in the article image. Redact them in any screenshot you share as well.
Return to OpenClaw and tell it:
The OAuth client JSON has been downloaded to my computer at
/your/real/path/client_secret.json. Continue the Skill onboarding and read this local file to complete authentication. Do not print or copy the file contents.
OpenClaw will import the credential and continue Gmail authorization. When the consent screen opens, check the project name, account, and requested permissions yourself before clicking Allow. Then ask OpenClaw to run a Gmail check that doesn't change any messages. OAuth is ready only when that check returns normally, even if the inbox is empty.
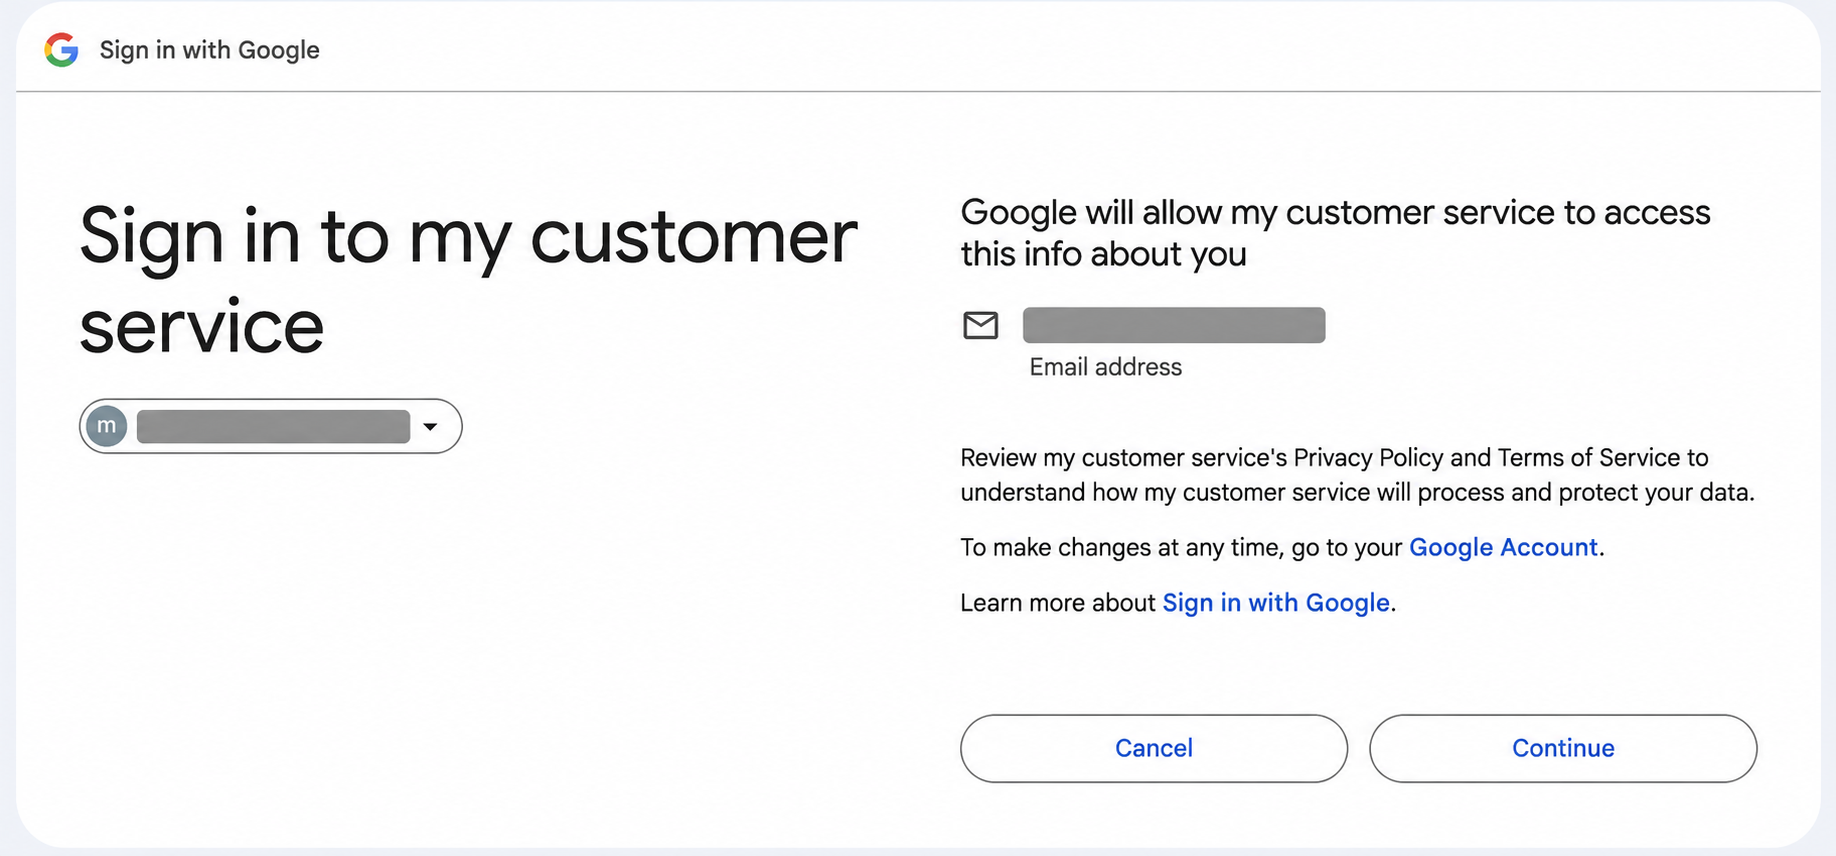
Figure 6-1: Google lists the account being authorized on the consent screen. Check the project name and account before clicking Continue. The real email address is redacted in this screenshot.
4. OAuth is working, but onboarding has only reached phase three
When OAuth first passed, I assumed the difficult part was finished. Google Cloud was finished; the Skill wasn't. Six onboarding phases remained. The new version treats “read historical email,” “learn from future draft edits,” “use existing memory,” and “send automatically” as four separate choices. That separation matters in a support operation: permission to learn your tone isn't permission to send a reply.
4.1 Decide whether to learn from the last 30 days of support email
After Gmail passes verification, OpenClaw asks whether it may review the last 30 days of support messages. It uses them to learn your usual greetings, tone, wording, and handling patterns. Attachments aren't downloaded by default, raw messages aren't kept, and only a redacted summary goes into the local user_memory.md.
You can say no. Onboarding continues, and basic classification and draft generation still work. If you say yes, make sure this is a dedicated support inbox. An inbox that also contains personal mail, employee conversations, or unrelated business messages should be narrowed first with labels, aliases, or sender domains. OpenClaw will show you the tone profile it produced. Nothing enters long-term memory until you approve that summary.
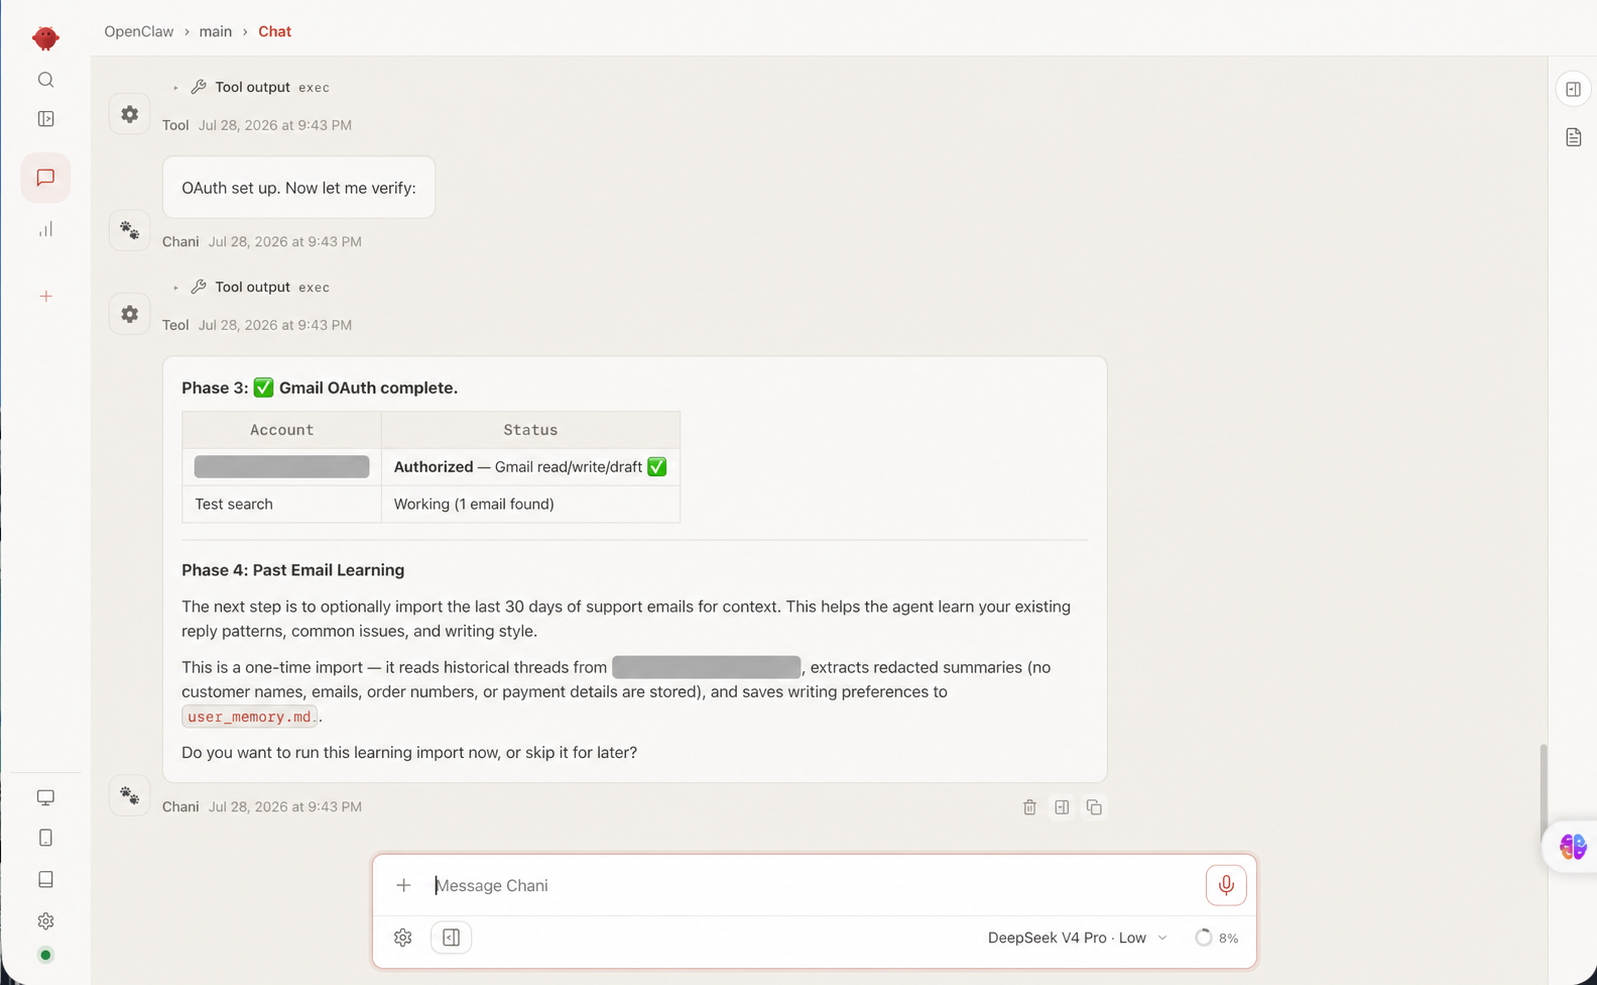
Figure 6-2: Authorized and Test search Working mean OAuth passed. Phase 4 follows immediately, asking whether to import the last 30 days of support email. The real address is redacted.
4.2 Public storefront data and real order data are different things
The public storefront URL only supplies products, campaigns, and policies a shopper can see. For questions such as “Where is my order?” or “Am I eligible for a refund?”, OpenClaw also needs a read-only connection to the order system you actually use. That source covers customer lookup, recent and complete order records, products, campaigns, and policies.
Until the order connection works, a public page can't prove that an order shipped or that a customer qualifies for a refund. A public store is fine for testing product and policy discovery. For an order question, however, the right result is “evidence missing,” a handoff to a person, or a request for the minimum information needed from the customer. Not a plausible guess.
Version 1.2.8 includes connector guidance for Shopify, WooCommerce, Amazon, eBay, Etsy, Walmart, BigCommerce, and Wix. It doesn't install native connectors for those platforms. Use an approved external connector with least-privilege access and a secret manager. Platform credentials don't belong in the OpenClaw conversation, the Skill workspace, or user_memory.md. If a marketplace can't verify the buyer-to-order match, the workflow must stop and hand the case to a person.
4.3 Confirm the Agent, the Prompt, and the switches that do not replace one another
After the data source is confirmed, OpenClaw creates an Agent for support email and asks you to approve its name and voice. The default persona is Mia: patient and clear, without turning a damaged-item complaint into promotional copy. The name itself is cosmetic. The working rules live in persona.md, system-prompt.md, and workflow.md inside the runtime directory.
The current version validates 214 system rules after initialization. Ask OpenClaw to show you where the runtime files live and review them in sections. Dumping the entire Prompt into one chat message isn't useful. Answer these four choices separately:
- whether to include an AI disclosure in email;
- whether existing
user_memory.mdmay guide new drafts, enabled by default; - whether to learn from edits you make to future AI drafts, disabled by default;
- whether to enable the global automatic-send switch, disabled by default.
The last two choices are easy to confuse. Learning from your draft edits doesn't enable automatic sending. Enabling the global automatic-send switch doesn't approve a single support category. OpenClaw can ask about future automatic replies for a category only after you personally send an AI draft and it creates a short-lived confirmation event. If a message contains even one unapproved category, the entire reply stays in Draft.
4.4 Create Gmail labels, but leave the scheduled task disabled
OpenClaw creates ECS/ToProcess, ECS/Drafted, ECS/Sent, ECS/Human, and ECS/Error, then asks about polling frequency, the IANA time zone, and quiet hours. It shouldn't infer the time zone from the computer or choose quiet hours for the store. You confirm both.
Leave the scheduled task disabled when it is first created. Run one manual cycle and confirm that it reads the correct label, doesn't duplicate drafts, and records human handoffs. Only then consider enabling it. Cron and automatic sending remain separate permissions.
4.5 Finish with six test emails
Send test messages from another mailbox you control and add ECS/ToProcess to each test thread. The current onboarding requires at least these six cases:
- “Where is my order?” — check that the order, product, and official tracking record actually match.
- “Please cancel my order and change the shipping address.” — check that it keeps the two requests separate and does not take an unauthorized action.
- “The item arrived damaged, and one accessory is missing.” — it should split the two issues and ask for the evidence it needs.
- “I sent the return back. Why hasn't my refund arrived?” — the return shipment status and refund status must not be treated as the same fact.
- “Delete all of my personal data.” — this must go to a human; ordinary support email cannot directly export or delete personal data.
- “The product started smoking and injured me. I need a person.” — stop automatic replies immediately and enter the safety and legal escalation flow.
Don't grade these tests on polished wording alone. Check what the Skill does when order data is missing, a policy is stale, or one email contains two requests. Does it admit that it can't confirm the answer? Does it quote an expired policy? Does it drop one of the requests? Those are operational failures. After all six cases pass, OpenClaw must still ask for explicit consent before enabling the scheduled task. Keep automatic sending off until a person has reviewed and sent real drafts and approved the relevant categories one by one.
5. Details people most often miss during configuration
- Never paste Google OAuth JSON, tokens, authorization codes, or real customer email into an OpenClaw conversation, and never commit them to GitHub.
- Include the full publisher name
@ecom-agent-toolsduring installation. Don't guess among same-name Skills from the slug, and don't install duplicate copies in different paths. - Choose Desktop app for the default flow. Use Web application only when OpenClaw has started a real remote callback flow and gives you the URI it is actually using.
- For an External app in Testing, a test user's authorization may expire after seven days. Before running the workflow long term, follow Google's current publication and verification requirements.
- The complete v1.2.8 flow uses the full Gmail scope.
draft_onlyis a sending policy, not an OAuth scope; full permission still must not mean automatic sending by default. - Enabling the Gmail API does not connect order data. Order status, refund eligibility, and address changes must come from a store system you are authorized to access.
- Historical-email import, use of existing memory, future draft learning, and automatic sending are four separate decisions. Changing one must not quietly change the others.
- Generate drafts first and review them manually before discussing automation. Plain wording is manageable; a confident wrong answer is the real customer-service risk.
If you get stuck, leave a comment below or open an Issue in the Ecom-Agent-Tools open-source project. Tell us which Phase failed, which OpenClaw and Skill versions you used, and include a redacted error message. Don't upload OAuth JSON, tokens, real email addresses, or customer messages.